Support: BrickHouse Team Phone Tracker App User Guide for iOS
The BrickHouse Phone Tracker Mobile app is an application providing you with the basics of tracking via your smartphone device. The Phone Tracker Mobile app is available for both Android and iOS platforms. This is an iPhone User’s Guide.
The BrickHouse Phone Tracker application is used for tracking the unit’s location. The BrickHouse Phone Tracker can be installed on iOS-based mobile devices. The location is tracked mainly using GPS, therefore the device will need to have an active data plan.
Position data is sent from the mobile device to the locate.brickhousesecurity cloud to be stored. Besides position data (coordinates, course, speed. etc.), images, alarm messages, and custom statuses can also be sent to the server. Data received from a mobile device can be processed by a tracking system and presented in different forms such as tracks of traveled routes on the map, notifications, etc.
Download User Manual
Getting Started
Starting the Application and Selecting a Mode
You should have received an email containing the following details:
-
Server Address: 193.193.165.20963
-
Unique ID: Your email address
-
Temporary Password: Abcdefg123 (default)
This information is required to access the features of the BrickHouse Phone Tracker application.
To begin:
-
Open the BrickHouse Phone Tracker application.
-
Select the UID option to launch the login screen.
-
Enter the server address, unique ID, and temporary password provided in the email.
-
Ensure all information is entered correctly to successfully run the application.
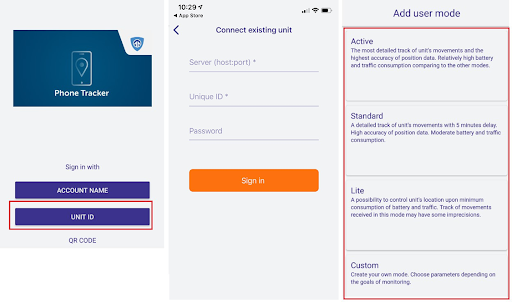
Choosing a User Mode
After successfully connecting to the BrickHouse Phone Tracker, you will need to choose a user mode: Active, Standard, Lite, or Custom. Each mode is designed with specific data collection and transmission behaviors to suit different tracking needs and power/data usage preferences.
Active Mode
This mode provides the most detailed tracking of a unit’s movements with the highest accuracy. However, it also consumes more battery and data compared to other modes.
-
Data Collection: Continuous
-
Data Sending: Continuous
-
Maximum Accuracy: Up to 30 meters
-
Note: Ideal for real-time, precise tracking, but expect higher battery and data usage.
Standard Mode
Offers detailed tracking with a slight delay, balancing accuracy with moderate battery and data consumption.
-
Data Collection: Smart mode
-
Data Sending: Every 5 minutes (by timeout)
-
Maximum Accuracy: Up to 50 meters
-
Note: A good balance between performance and power efficiency.
Lite Mode
Designed for minimal power and data consumption. It provides basic location tracking, though with lower accuracy and less frequent updates.
-
Data Collection: Every 5 minutes (by timeout)
-
Data Sending: Every 5 minutes (by timeout)
-
Maximum Accuracy: Up to 1000 meters
-
Note: Best suited for long-term tracking where precision is less critical.
Custom Mode
Allows full manual configuration of tracking parameters to meet specific requirements. By default, all settings start with the values used in Standard mode.
-
Data Collection and Sending: User-defined
-
Accuracy: Depends on custom settings
-
Note: Recommended for advanced users with specific tracking goals.
Mobile App Main Screen Overview
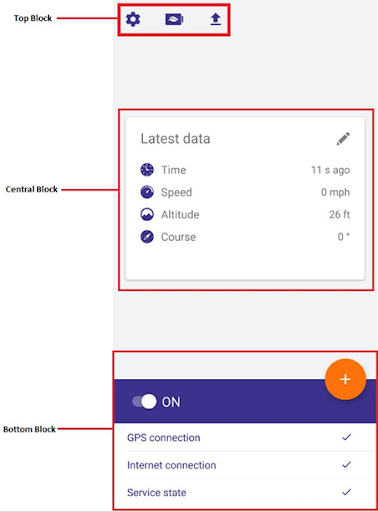
The main screen of the BrickHouse Phone Tracker application is organized into three main sections: Top, Central, and Bottom blocks. Each section provides access to specific functions and status indicators essential for the operation of the app.
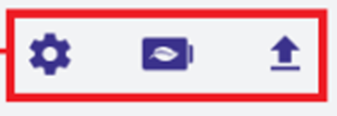
Top Block
This section contains three key function buttons:
-
Arrow Icon: Downloads messages from the black box. A red indicator appears when messages are available.
-
Battery Icon: Enables power-saving mode when tapped.
-
Gear Icon: Opens the application settings menu.
Central Block
This area displays either the unit’s latest data or allows the user to send the unit's current status, depending on the selected view. Use a horizontal swipe to switch between the two functions:
-
Latest Data View: Displays the most recent tracking data received from the unit.
-
Current Status Sender: Sends the current status of the unit based on the active configuration.
Note: Both functions require the following:
-
An active GPS connection
-
Internet access
-
The location determination service to be enabled
Bottom Block
When the app is first launched, the location determination service is disabled. Tap the button at the top of the bottom block to start it.
The bottom block also displays real-time indicators of essential system statuses:
-
GPS Connection: Indicates whether GPS is active and available.
-
Internet Connection: Indicates whether the device is connected to the internet.
-
Service Status: Shows whether the location determination service is running.
Other
Tap the ‘+’ button to open the Actions Menu.
Important: All actions within this menu require an active internet connection.
Actions Menu
Accessible though User mode option This menu contains a list of actions available for a chosen user mode:
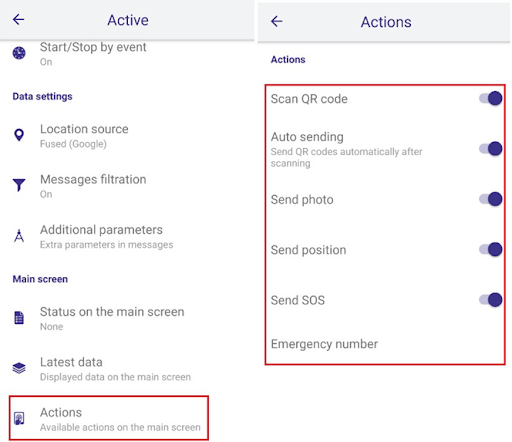
Scan QR Code / Barcode
The built-in scanner allows you to scan both QR codes and barcodes, making it easy to capture and transmit tracking-related data.
Scanner Options
Within the Actions settings, you can configure the scanner behavior to:
-
Preview the scanned code before sending
-
Automatically send the code immediately after scanning
How It Works
Once a QR code or barcode is scanned:
-
A message containing the
qrparameter is generated -
This message is sent to the server
-
The scanned value is stored in the system database for future monitoring and reference
Auto-Sending Option
You can enable or disable automatic sending of scanned codes in the settings. When disabled, you’ll be able to preview and confirm the data before it’s transmitted.
Note: All scanning-related actions require an active internet connection to function properly.
Send Photo
Photos sent from the application are uploaded to the system’s server and stored in the database for future monitoring and reference. Each photo is accompanied by the unit's current location at the time of sending.
Before sending a photo, it is recommended to set the desired image quality in the settings.
Sending Options:
-
From Camera: Take a new photo and send it directly to the server.
-
From Library: Select and send an existing image from your device’s storage.
Note: An active internet connection is required to send images.
Send Position
This function allows the current location of the unit to be sent manually to the server. The location data is saved in the system’s database and can be accessed later for monitoring purposes.
Note: Accurate GPS and internet connections are required for successful position sending.
Send SOS
Use this feature to send an SOS alert in case of emergency. The system generates an alarm message with the format alarm=1, which is stored and flagged in the monitoring interface.
-
The unit's location at the moment of sending is automatically included.
-
If the system cannot determine the current position, the last known location will be used instead.
Emergency Contact Setup:
-
Enter a telephone number to receive SOS alerts via SMS or call (based on device and system configuration).
Important: SOS functionality requires an active GPS and internet connection for location tracking and message delivery.
Custom Statuses
The BrickHouse Phone Tracker allows users to create and send custom status messages, enabling more flexible and personalized tracking updates.
Creating Status Templates
Users can define any number of custom status templates in the application settings. Each template can include a set of predefined status values.
Examples:
-
Template 1: Free, Busy, Away
-
Template 2: Private, Business, Unified
These templates help categorize the unit's state or activity based on user-defined criteria.
Sending a Status
Custom statuses can be selected and sent directly from the main screen of the app. Once sent, the status is recorded in the system's database and becomes part of the monitoring data.
Note: An active internet connection is required to send status updates to the server.
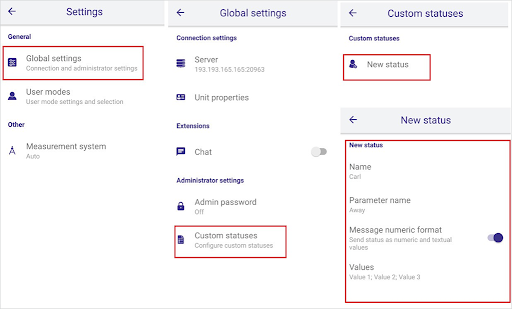
Creating a Custom Status Template
To create a custom status template, follow these steps:
-
Open the Application Settings:
From the main screen, tap the gear icon in the top block to access the settings. -
Navigate to Custom Statuses:
In the Administrative Settings section, select Custom Statuses. -
Create a New Template:
Tap the “Create Template” button and fill in the required parameters:-
Name: Enter a name for the template (e.g., “Work Status”).
-
Parameter Name: Define the name of the status parameter that will be sent to the server.
-
Message Numeric Format: Enable or disable sending numeric index values along with the status name in the message.
-
Values: Add as many status values as needed (e.g., Free, Busy, Away), assigning a name to each.
-
Once saved, the template will be available for use on the main screen for quick status updates.
Sending Custom Statuses
Custom statuses created in the settings can be sent directly from the central block of the main screen.
How to Send a Status:
-
Use the horizontal slider to switch between available status templates.
-
Tap the desired status value to send it.
Once selected, the status is transmitted to the server as a data message, containing the parameter name and its selected value.
Location Data:
-
Status messages are typically sent along with the unit’s coordinates.
-
If real-time location data is unavailable, the system will use the last known position.
Monitoring and Notifications:
-
Sent statuses appear in the tracking system and can be used to trigger notifications.
-
To enable this, set the notification type to “Message Parameter Control.”
-
Notifications for received statuses can be configured as:
-
Email alerts
-
SMS
-
Online popup messages
-
-
Statuses can also be logged in the unit’s database and included in custom reports.
Deleting a Template
To delete a custom status template:
-
Go to Settings > Administrative Settings > Custom Statuses.
-
Select the template you want to remove.
-
Tap the delete button at the bottom of the screen.
-
Confirm your action in the dialog that appears.
Note: Deleting a template is permanent and will remove all associated status values.
Administrator Settings Menu
The User Settings Menu allows configuration of parameters that affect both the application's functionality and the performance of the location determination service.
Accessing the Settings:
-
From the main screen, tap the Gear icon (top block) to open the Settings Menu.
-
Navigate to the Administrative Settings section.
Visibility of Settings:
-
The number and type of available settings are defined under the "Visible Settings" option within Administrative Settings.
-
This determines which settings are shown to the user based on access level.
Administrator Access Control:
-
Access to administrative settings can be restricted by an administrator password.
-
This ensures that only authorized users can modify critical configurations.
Tip: Ensure you have the necessary credentials if settings appear limited or access is denied.
Global Settings
The Global Settings section contains essential configuration parameters that ensure proper communication between the BrickHouse Phone Tracker app and the locate.brickhousesecurity.com cloud platform.
Connection Settings
These settings manage the connection between your device and the BrickHouse Security monitoring server.
Important: Do not delete or modify these settings.
Any changes may disrupt the connection and prevent the application from reporting data to the server.
Unit Properties
These fields define the identity and access configuration of your device within the tracking system:
-
Unique ID:
A system-generated identifier used to recognize your device in the monitoring platform. -
Password:
Set a password for unit access, if required.
Note: This password must also be entered in the monitoring system's unit properties (under the same field). Otherwise, the server will reject incoming data from the unit.
If you need to update these credentials, please contact support@brickhousesecurity.com for assistance.
Bind Unit
Use this option to bind the application to a specific tracking unit.
-
Select the appropriate unit from the list to associate it with your device.
This binding is essential for the system to correctly log and monitor your data.
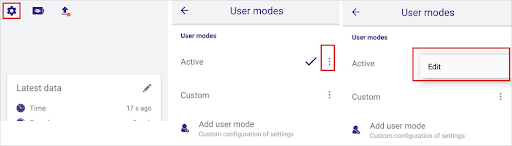
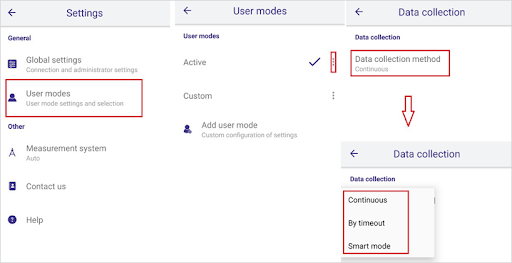
User Modes
Active Custom Operations Mode
The Active Custom Operations Mode allows you to customize the data collection behavior based on your specific tracking needs. By default, the following settings are applied, but they can be edited as necessary.
To access and adjust these settings, tap the Gear icon on the Main Screen and navigate to the User Mode settings.
Data Collection Settings
You can choose between different data collection modes based on your preference:
-
Active Mode (Default)
-
Data Collection: Continuous
-
This mode collects location data constantly, providing the highest level of accuracy. However, it comes with higher battery and traffic consumption.
-
-
Custom Mode (Default)
-
Data Collection: Smart Mode
-
In this mode, data collection occurs only when the unit is in motion. If the unit remains stationary for more than 5 minutes, the location service is paused, and the application switches to motion detection. Location determination is reactivated when movement is detected.
-
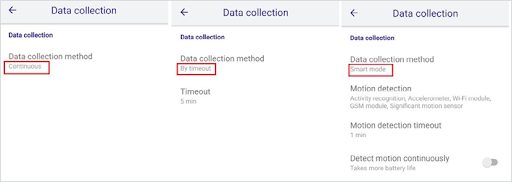
Available Data Collection Options:
-
Continuous Mode:
-
Location data is collected continuously, ensuring high accuracy.
-
Downside: This mode uses more battery and data traffic.
-
-
By Timeout Mode:
-
Location data is collected at regular intervals (the "timeout" period).
-
The default timeout is 5 minutes, but you can adjust this period in the settings.
-
Note: The shorter the timeout, the more frequent and accurate the data collection.
-
Impact: Battery and data consumption vary depending on the timeout interval.
-
-
Smart Mode:
-
Location data is only collected when the unit moves (motion detection).
-
After 5 minutes of no movement, the location service stops and switches to motion detection.
-
The location service automatically resumes when movement is detected again.
-
Continuous Mode
In Continuous Mode, location data is continuously sent to the server as long as the device is connected to the internet and the data is available in the black box.
-
Battery Consumption: This method uses a significant amount of battery, so it is recommended to use this mode when you have access to a charging source.
-
Data Sending: Location data is transmitted constantly without interruption.
Timeout Mode
In Timeout Mode, location data is sent to the server at regular intervals, as defined by the timeout period.
-
After sending the data, the device returns to sleep mode, conserving battery until the next data transmission.
-
Customization: You can adjust the timeout period (default is 5 minutes), depending on how frequently you need the location data to be sent.
-
Battery Efficiency: This mode is more energy-efficient compared to Continuous Mode because data is sent less frequently.
Motion Detection Mode (Smart Mode)
If Smart Mode is selected, motion detection parameters must be configured to suit the type of movement you want to track. The following options are available:
-
Activity Recognition:
Can be used on devices with the necessary hardware support. The efficiency of this method varies by device, so it should be tested individually. -
Accelerometer:
Suitable for users traveling on foot.
Note: This method may detect motion when the device is shaken while standing still, leading to potential inaccuracies. -
Wi-Fi:
This option detects movement based on the availability of Wi-Fi networks. The algorithm works as follows:-
If a Wi-Fi connection is available, the unit is considered stationary.
-
If Wi-Fi is not available, the unit is considered to be in motion.
Note: This method may not provide high accuracy due to the large number of Wi-Fi networks in urban areas, which can lead to false positives.
-
-
GSM (Cellular Networks):
Motion is detected by analyzing the location of nearby cellular base stations. The algorithm works as follows:-
The device determines the location of nearby base stations.
-
After a set period of time, the system checks if the base stations’ locations have changed. If they have, it indicates motion.
Note: This method may have some imprecision due to the nature of cellular base station positioning. It’s recommended to test the effectiveness of this method on each device individually.
-
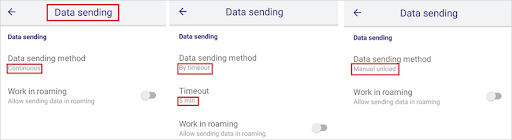
Data Sending Method
Location data can be sent using one of the following methods:
-
Continuous Sending:
Data is sent continuously to the server as long as the device is connected to the internet and location data is available. -
Timeout Sending:
Data is sent at regular intervals, with the timeout value defining the frequency. The timeout period should be set to no less than 5 minutes. -
Manual Sending:
Data is sent manually when triggered by the user.
Roaming Settings
The "Work in Roaming" option determines whether the device will send data while roaming:
-
Checked (Enabled): The device will send data even when roaming.
-
Unchecked (Disabled): The device will not send data while roaming.
Note: Roaming may incur additional charges, so ensure this setting is configured based on your data plan and preferences.
Start/Stop by Event
Auto Startup
Enable this option by checking the Auto Startup checkbox. This ensures that WiaTag automatically launches after your mobile device reboots.
Work While Charging
Activate the Work While Charging option to automatically start the WiaTag service when the charger is connected and stop it when the charger is disconnected. This feature helps save battery by running the service only when your device is charging.
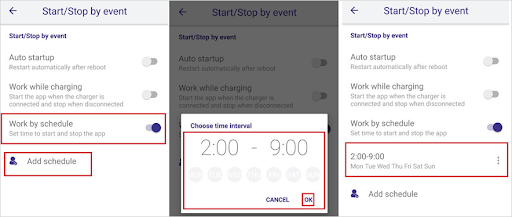
Work by Schedule
The Work by Schedule feature allows you to start or stop the WiaTag service automatically based on a defined schedule. Once this option is selected, the available schedule intervals will be displayed. Schedules can be easily edited or deleted as needed.
Note: A guide on how to create or modify schedules is provided below.
Add Schedule
To create a new schedule, follow these steps:
-
Ensure the "Work by Schedule" option is enabled.
-
Tap the “Add Schedule” button to open the schedule creation interface.
-
Set the time interval for starting and stopping the service, and select the days of the week when the service should be active.
-
Save the schedule.
You can edit or delete any existing schedules at any time.
Data Settings
Location Source
This setting allows you to select the method for determining the unit’s location. The available options are:
-
Google Fused (Default)
-
GPS
-
Wi-Fi and Mobile Networks
-
GPS + Wi-Fi + Mobile Networks
Note: Ensure that the relevant options are enabled in your mobile device's settings for proper location detection.
Messages Filtration
When enabled, this option applies the following parameters to messages being sent to the server. Message filtration can only be applied to GPS-generated messages, as wireless technologies (Wi-Fi and mobile networks) may not provide data such as speed, course, satellite count, etc., and the location accuracy could exceed 2000 meters.
Filtration conditions are as follows, and the logical OR operation applies—meaning a new message is generated if any of the following conditions are met. However, this does not apply to the Max Accuracy and Max Speed parameters, which are designed to exclude messages with improbably high values (potentially invalid data).
-
Max Accuracy:
The maximum allowable accuracy for a message. If exceeded, the message is considered invalid and will not be sent to the server. This parameter is always in effect, regardless of whether message filtration is enabled. -
Min Time Interval:
The minimum time interval (in seconds) between two consecutive messages. A new message will be generated once the specified time has passed since the previous message. -
Min Distance:
The minimum distance that the unit must travel before a new message is generated. A new message is sent only if the unit has moved beyond the specified distance from the previous message. -
Change in Course:
The minimum angle (in degrees) required to trigger a new message. If the unit changes direction by the specified angle, a new message will be sent. -
Change in Speed:
The minimum speed change (difference between the current and previous speeds) required to trigger a new message.
Additional Parameters
You can choose which additional parameters to include in the data messages:
-
LBS Data:
Includes information about the nearest cellular base stations (e.g., cell tower ID) in the message. -
Provider Name:
Displays the source of the location data (e.g., GPS, Wi-Fi) in the message with parameter ‘p’. -
Accuracy:
Shows the accuracy of the detected location (in meters) with parameter ‘a’. -
Battery Level:
Includes the unit’s battery level (in percentage) with parameter ‘b’. -
Last Status:
Includes the last indicated unit status in the message.
Thank you for choosing BrickHouse Security for your GPS tracking solutions. We are committed to providing you with reliable service and support.
If you require further assistance or have any questions regarding our products or services, please don’t hesitate to contact us through any of the following methods:
-
Phone: 800-654-7966
-
Live Chat: Available at BrickHouseSecurity.com
Our support team is here to help ensure you get the most out of your GPS tracking experience.
Jan 3rd 2024