Support: Locate GPS Site Guide
Locate GPS Site is a powerful and user-friendly platform designed to provide comprehensive monitoring and management of your GPS tracking devices. Accessible via desktop and mobile devices, this platform offers real-time tracking, detailed reporting, and customizable alerts. Whether you're managing a fleet of vehicles, keeping track of valuable assets, or ensuring the safety of loved ones, the Locate GPS Site gives you the tools you need to stay informed and in control.
Log In
Please go to brickhousesecurity.com/login/gps.
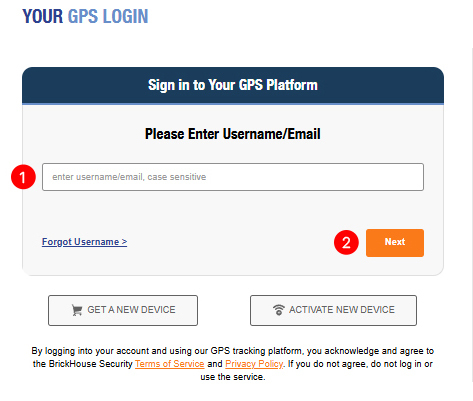
Enter the username or email address from the login email you received, then click Next. Enter the password and click Log In. The characters used in these fields are case-sensitive. You will be asked to update the password when you first log in.
Getting a New Password
If you have already registered in the system but forgot your password, enter your email address and click Next. On the next page, click on the Forgot password link. If the information entered matches the existing data in the database, a pop-up message will appear, and instructions for setting your password will be sent to you via email.
If you pressed Forgot password by accident, delete the received email with a password reset link and use your previous login and password. If you follow the link, you must enter a new password. You can reset the password no more than once a minute.
We want to ensure that you fully understand the platform you're using to manage your device. We have provided everything from educational articles to tutorial videos, ensuring that you have all the information you need. If you have further questions that are not answered by these materials, we invite you to contact our customer support team directly. We are always available to help!
Download User Manual
Attached below is the Locate GPS App Guide.
Customizing the Interface
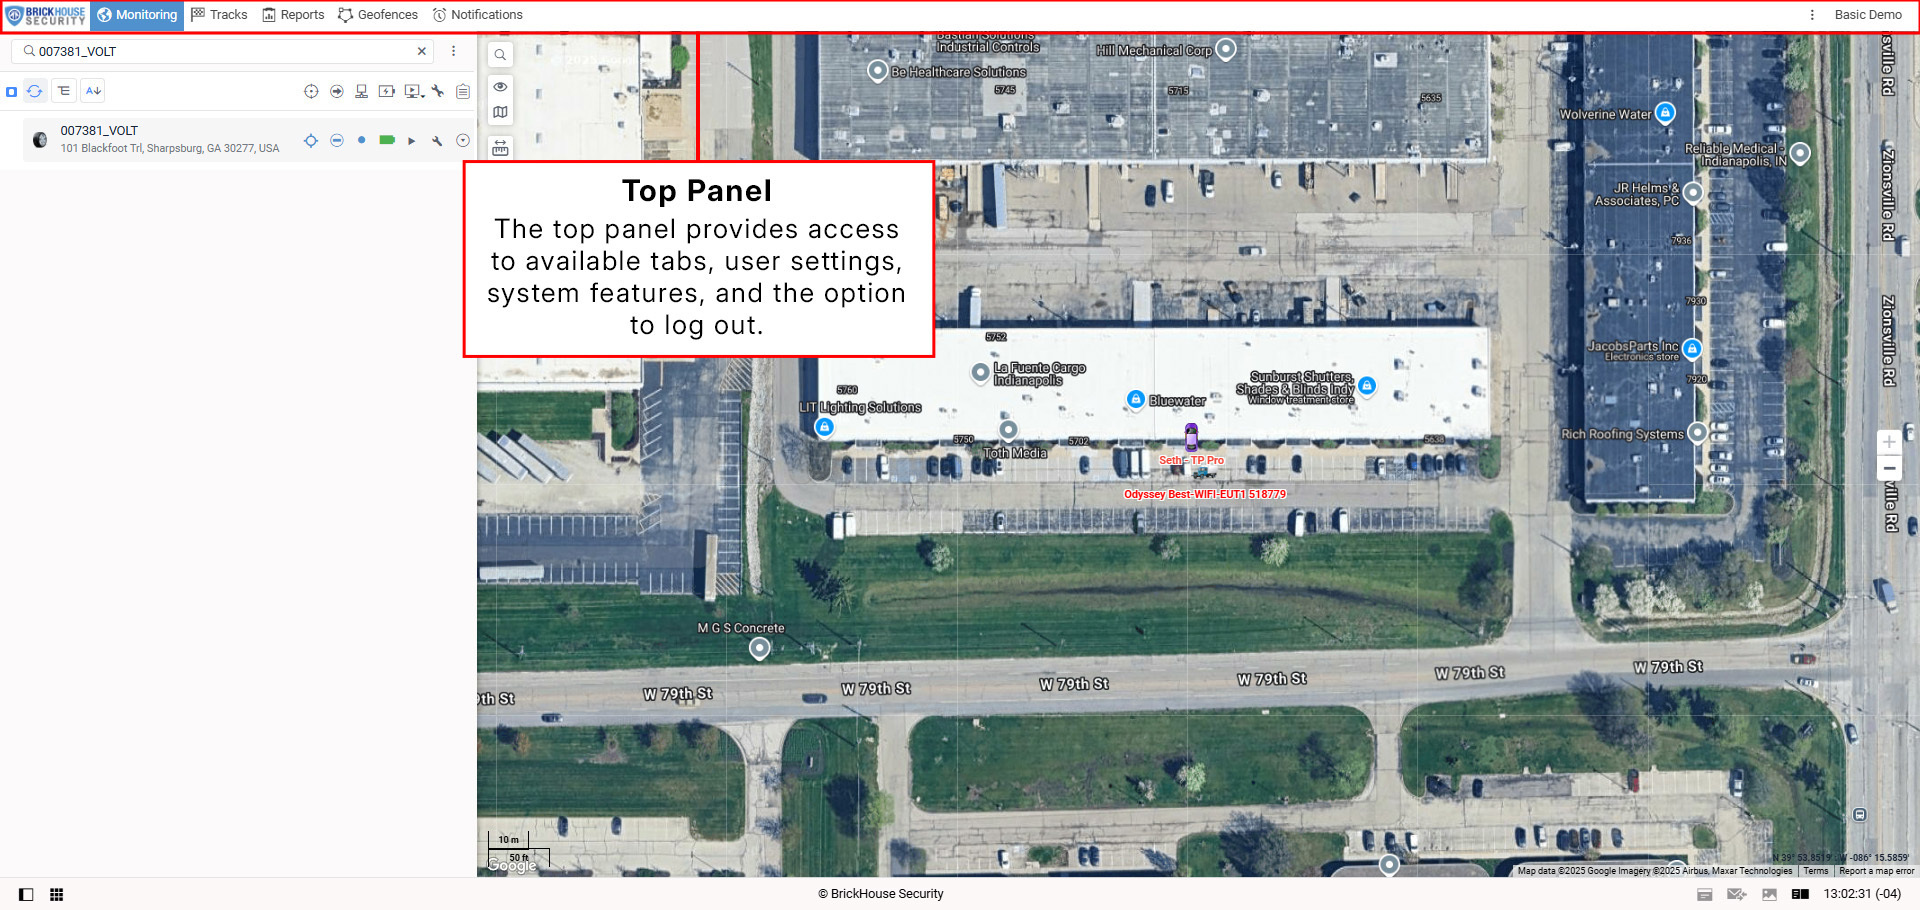
Top Panel
The platform's main menu in the top panel offers various elements tailored to your access settings.
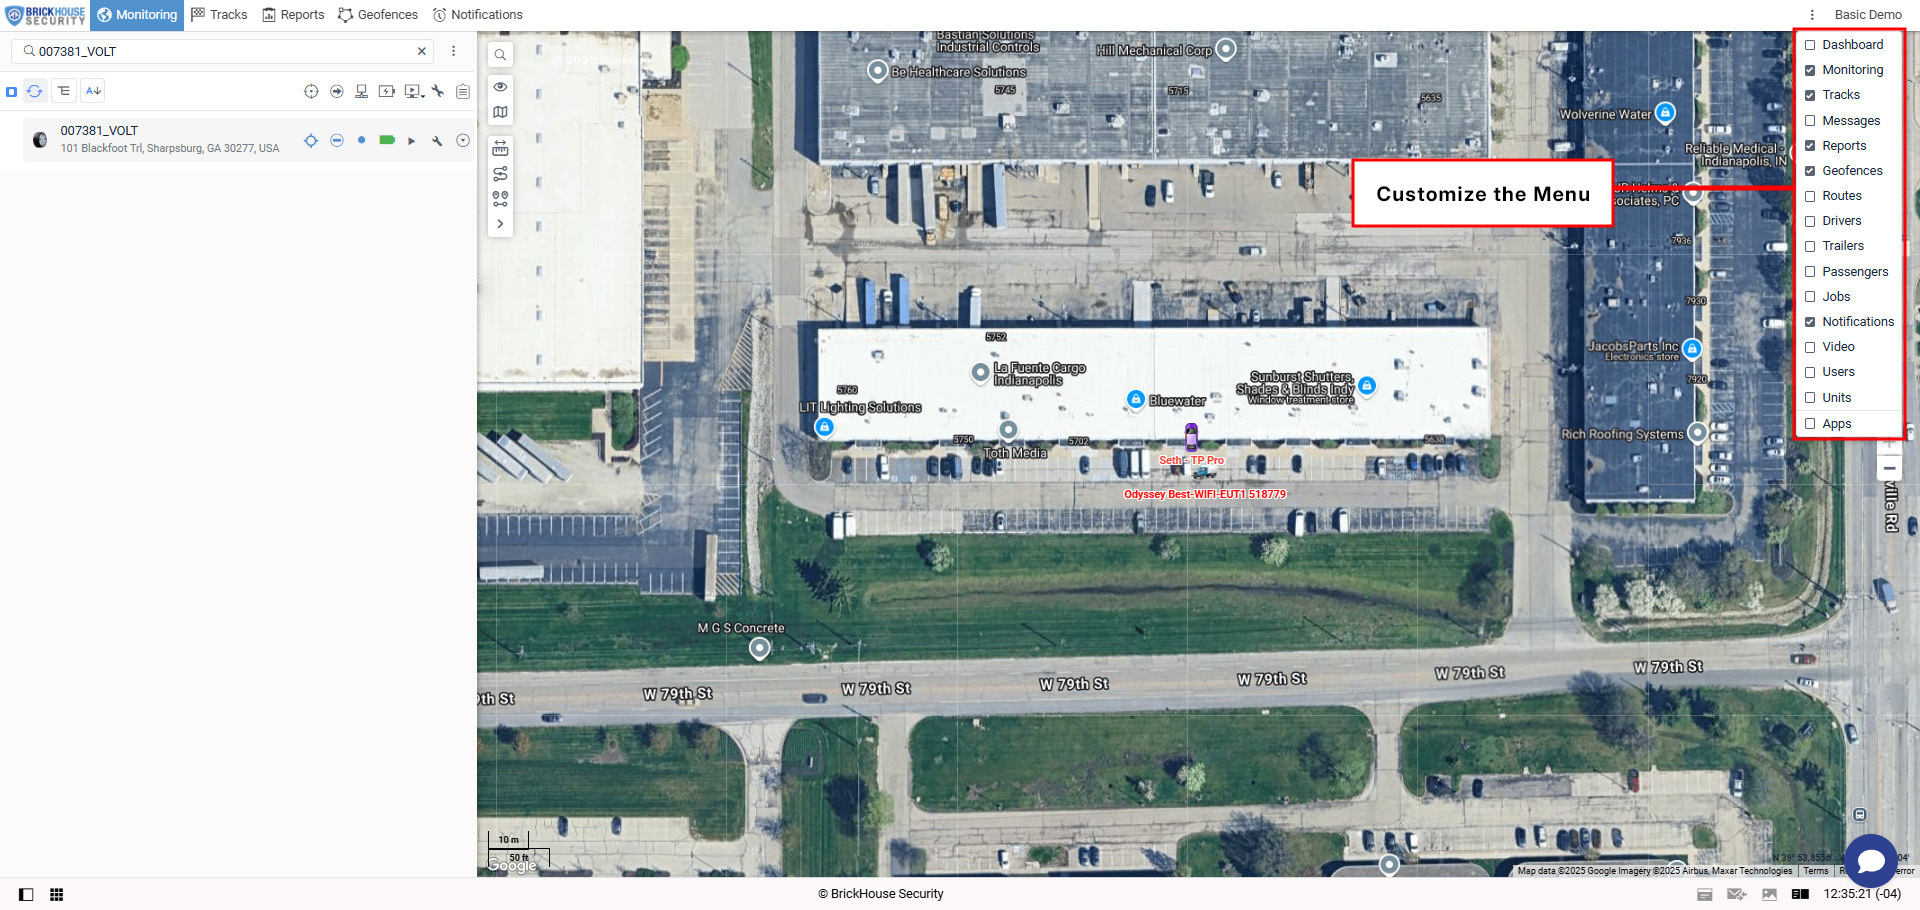
Customize the Menu
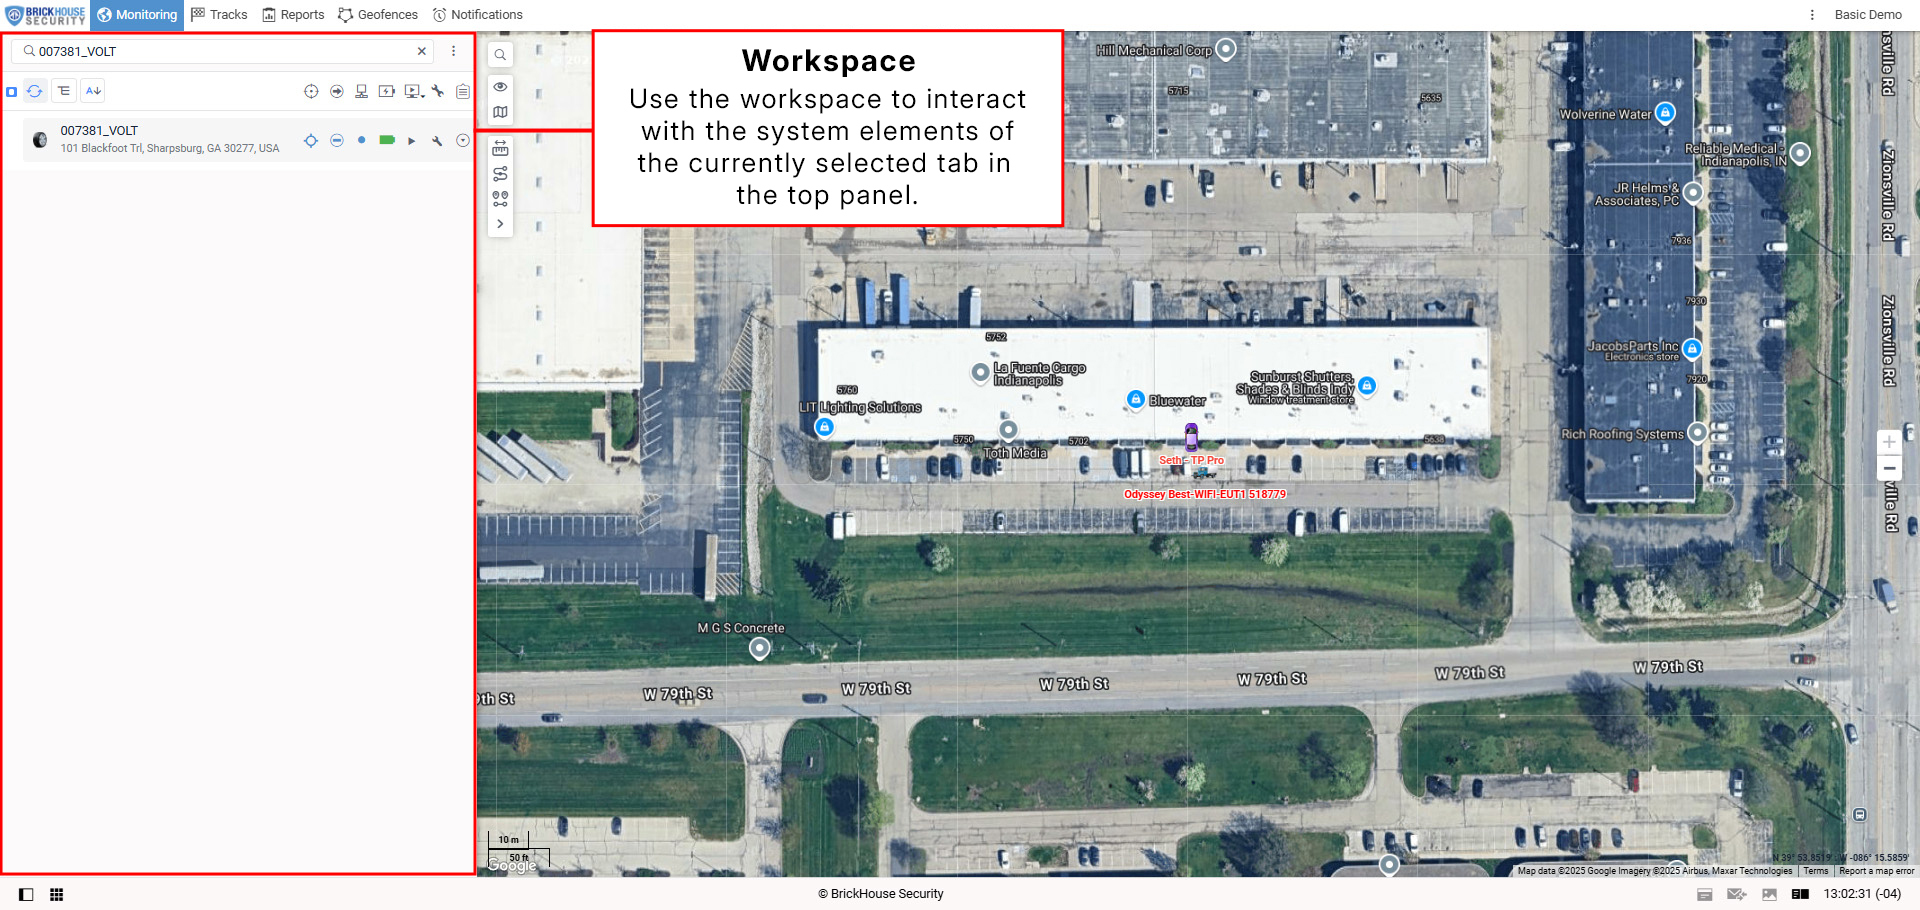
Workspace
Map
Bottom Panel

User Menu
At the right corner of the top panel, the username used to log in is displayed. Clicking on the username opens a menu with the items listed below.
|
User settings |
Open user settings for viewing and/or editing. |
|
Session management |
Open the Session management window. Shows the list of applications with access to your account and devices that can receive mobile notifications from BrickHouse. The lists are created automatically after logging in to the application. |
|
Locator |
Opens the Locator dialogue box. Allows you to share the unit location in real time. |
|
Help |
Request help from our Tech Support team |
|
Logout |
Click here to log out of the system. |
User Settings
To choose user parameters, click on the username in the right corner of the top panel and press the ‘User settings’ button in the dropdown menu. Next, follow the steps:
- Indicate your time zone.
- Select the type of daylight savings time used in your region.
Please select the settings properly, as they will be used when generating reports, messages, and elsewhere throughout the system.
Indicate a city in the dialogue box to scale the map for tracking entries.

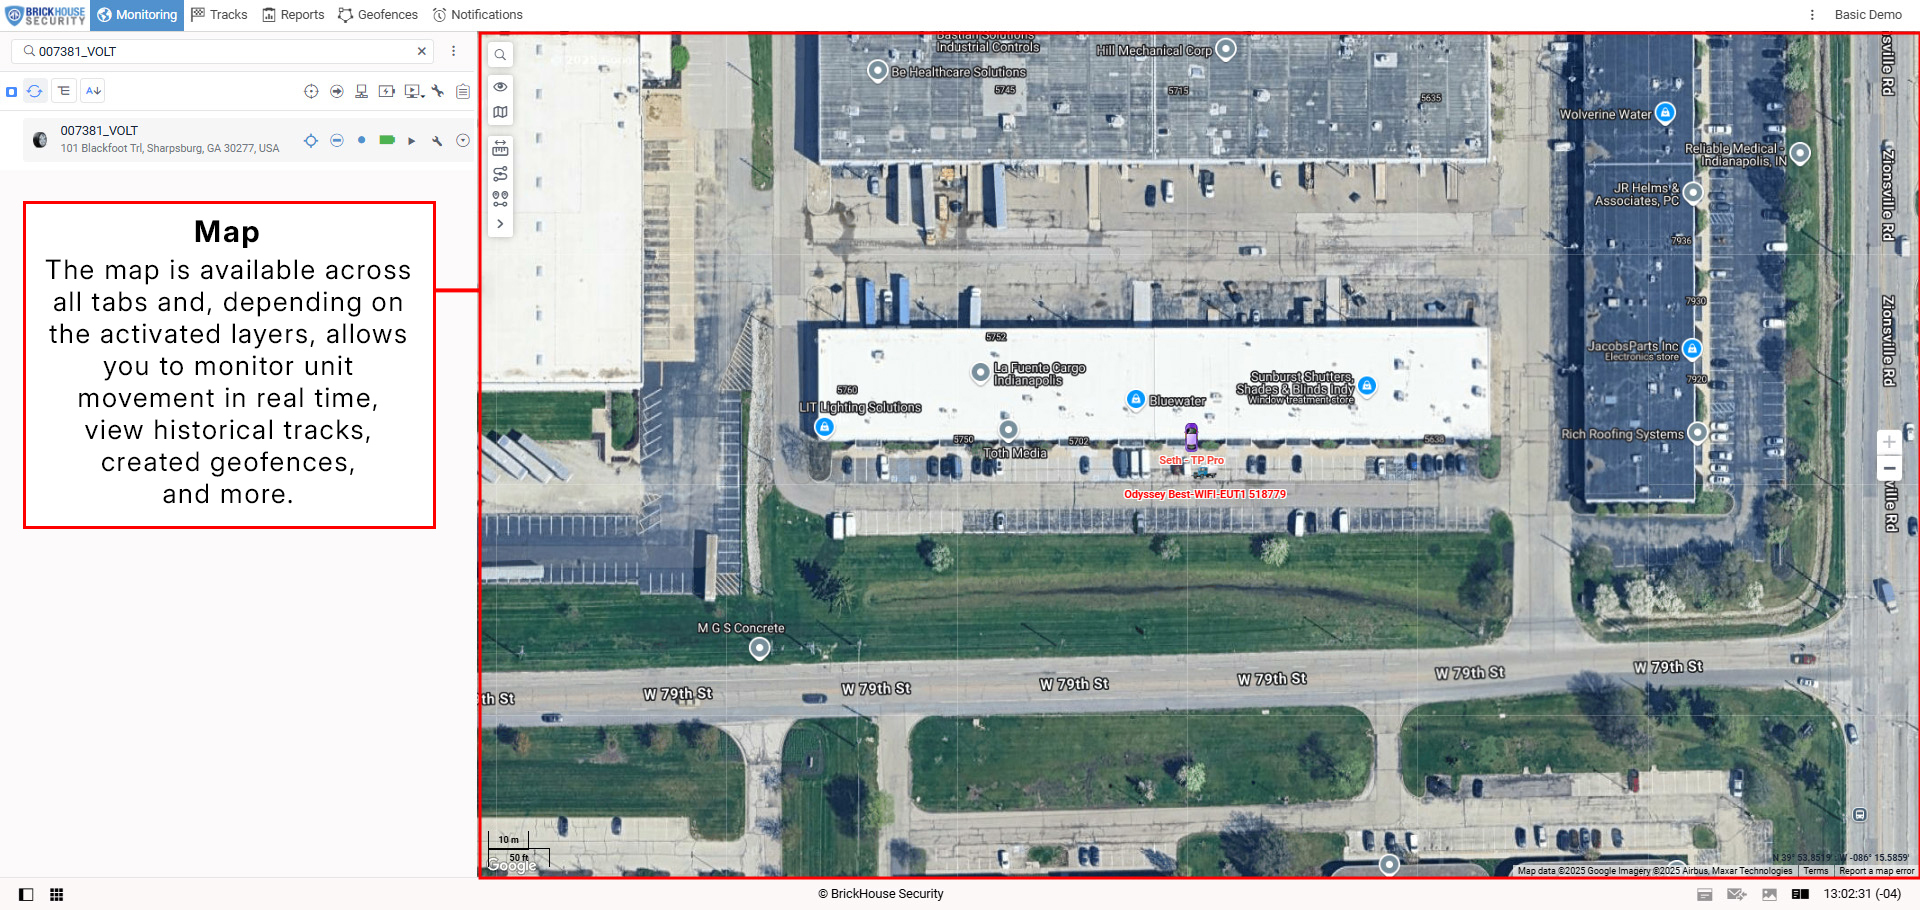
Monitoring Tab
The Monitoring tab gives access to the main tracking features. Here you can watch the movement of units on the map, send commands and messages to them, monitor parameter changes online, etc.
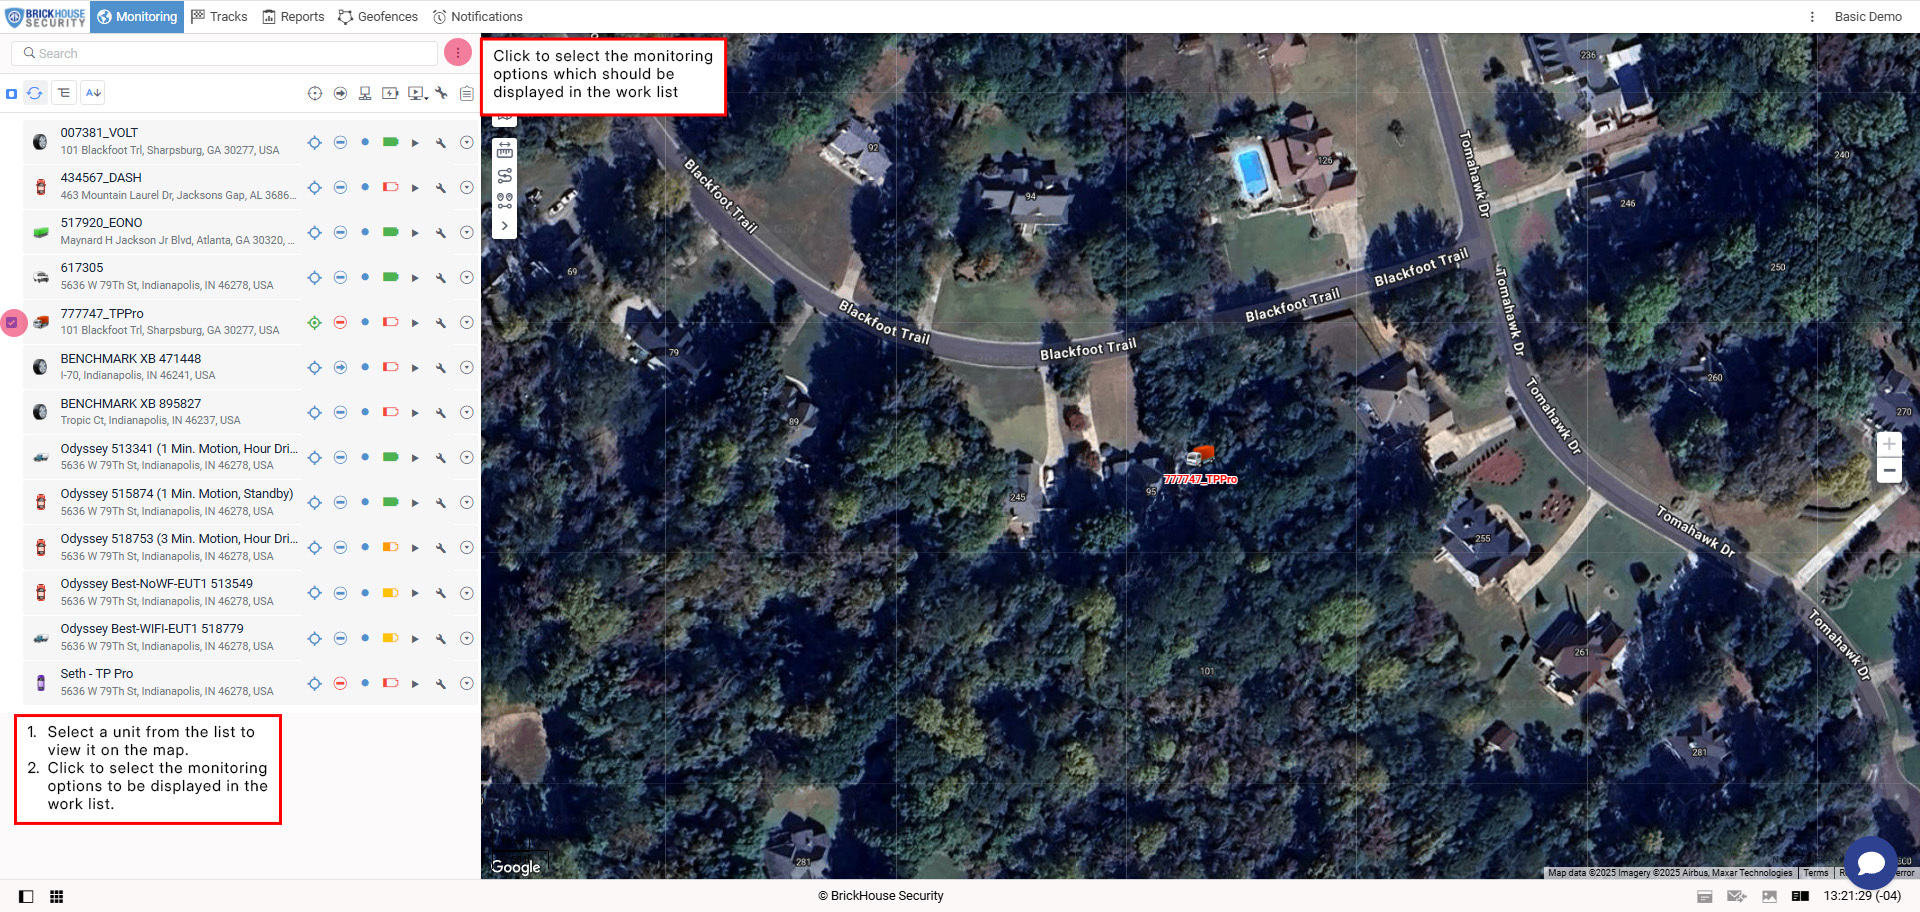
To open the Monitoring tab, click on its heading in the top panel. The tab has a list of units that you can monitor on the map. The list can contain all units available or just some of them. You can easily add and remove units from the monitoring list, which does not lead to their removal from the system.
To quickly find a unit in the list, use the dynamic search bar above it. Next to the name of each unit, some icons allow you to assess the state of the unit or perform certain actions. Above them, in the header of the table, some icons allow you to order units according to various parameters. To display the icons in the work list, configure the monitoring options.
Unit Work List
You can add one or more available units to the Work List on the Monitoring tab. Units not added to this list will not be available for use in other parts of the system, such as configuring notifications, generating reports, requesting tracks, and performing most actions on other tabs.
Within the Work List, you can perform various tasks, including filtering and sorting units, as well as adding or removing them from the list (note: removing a unit from the Work List does not delete it from the system).
Unit Icons
By default, each unit is displayed on the map with an icon and a caption showing its name. You can customize the icon by selecting one from the built-in icon library in the unit's properties.
![]()
Inactive Units
If there are no data messages from a unit for more than 48 hours, the unit is considered inactive.
A unit's icon and name tell you its condition. Inactive units are displayed on the map with blurred icons and transparent names.
![]()
Motion State Signs
You can choose to replace unit icons with motion state indicators, which visually show whether a unit is moving or stationary. To enable this feature, go to User Settings and select the Replace unit icons with motion state signs option.
|
Sign |
Description |
|
|
The unit is moving. The direction of the arrow indicates the direction of movement. |
|
|
The unit is stationary. If an ignition sensor is configured, this means the engine is off. |
|
|
The unit is stationary, but the engine is on (available only for units with ignition sensors). |
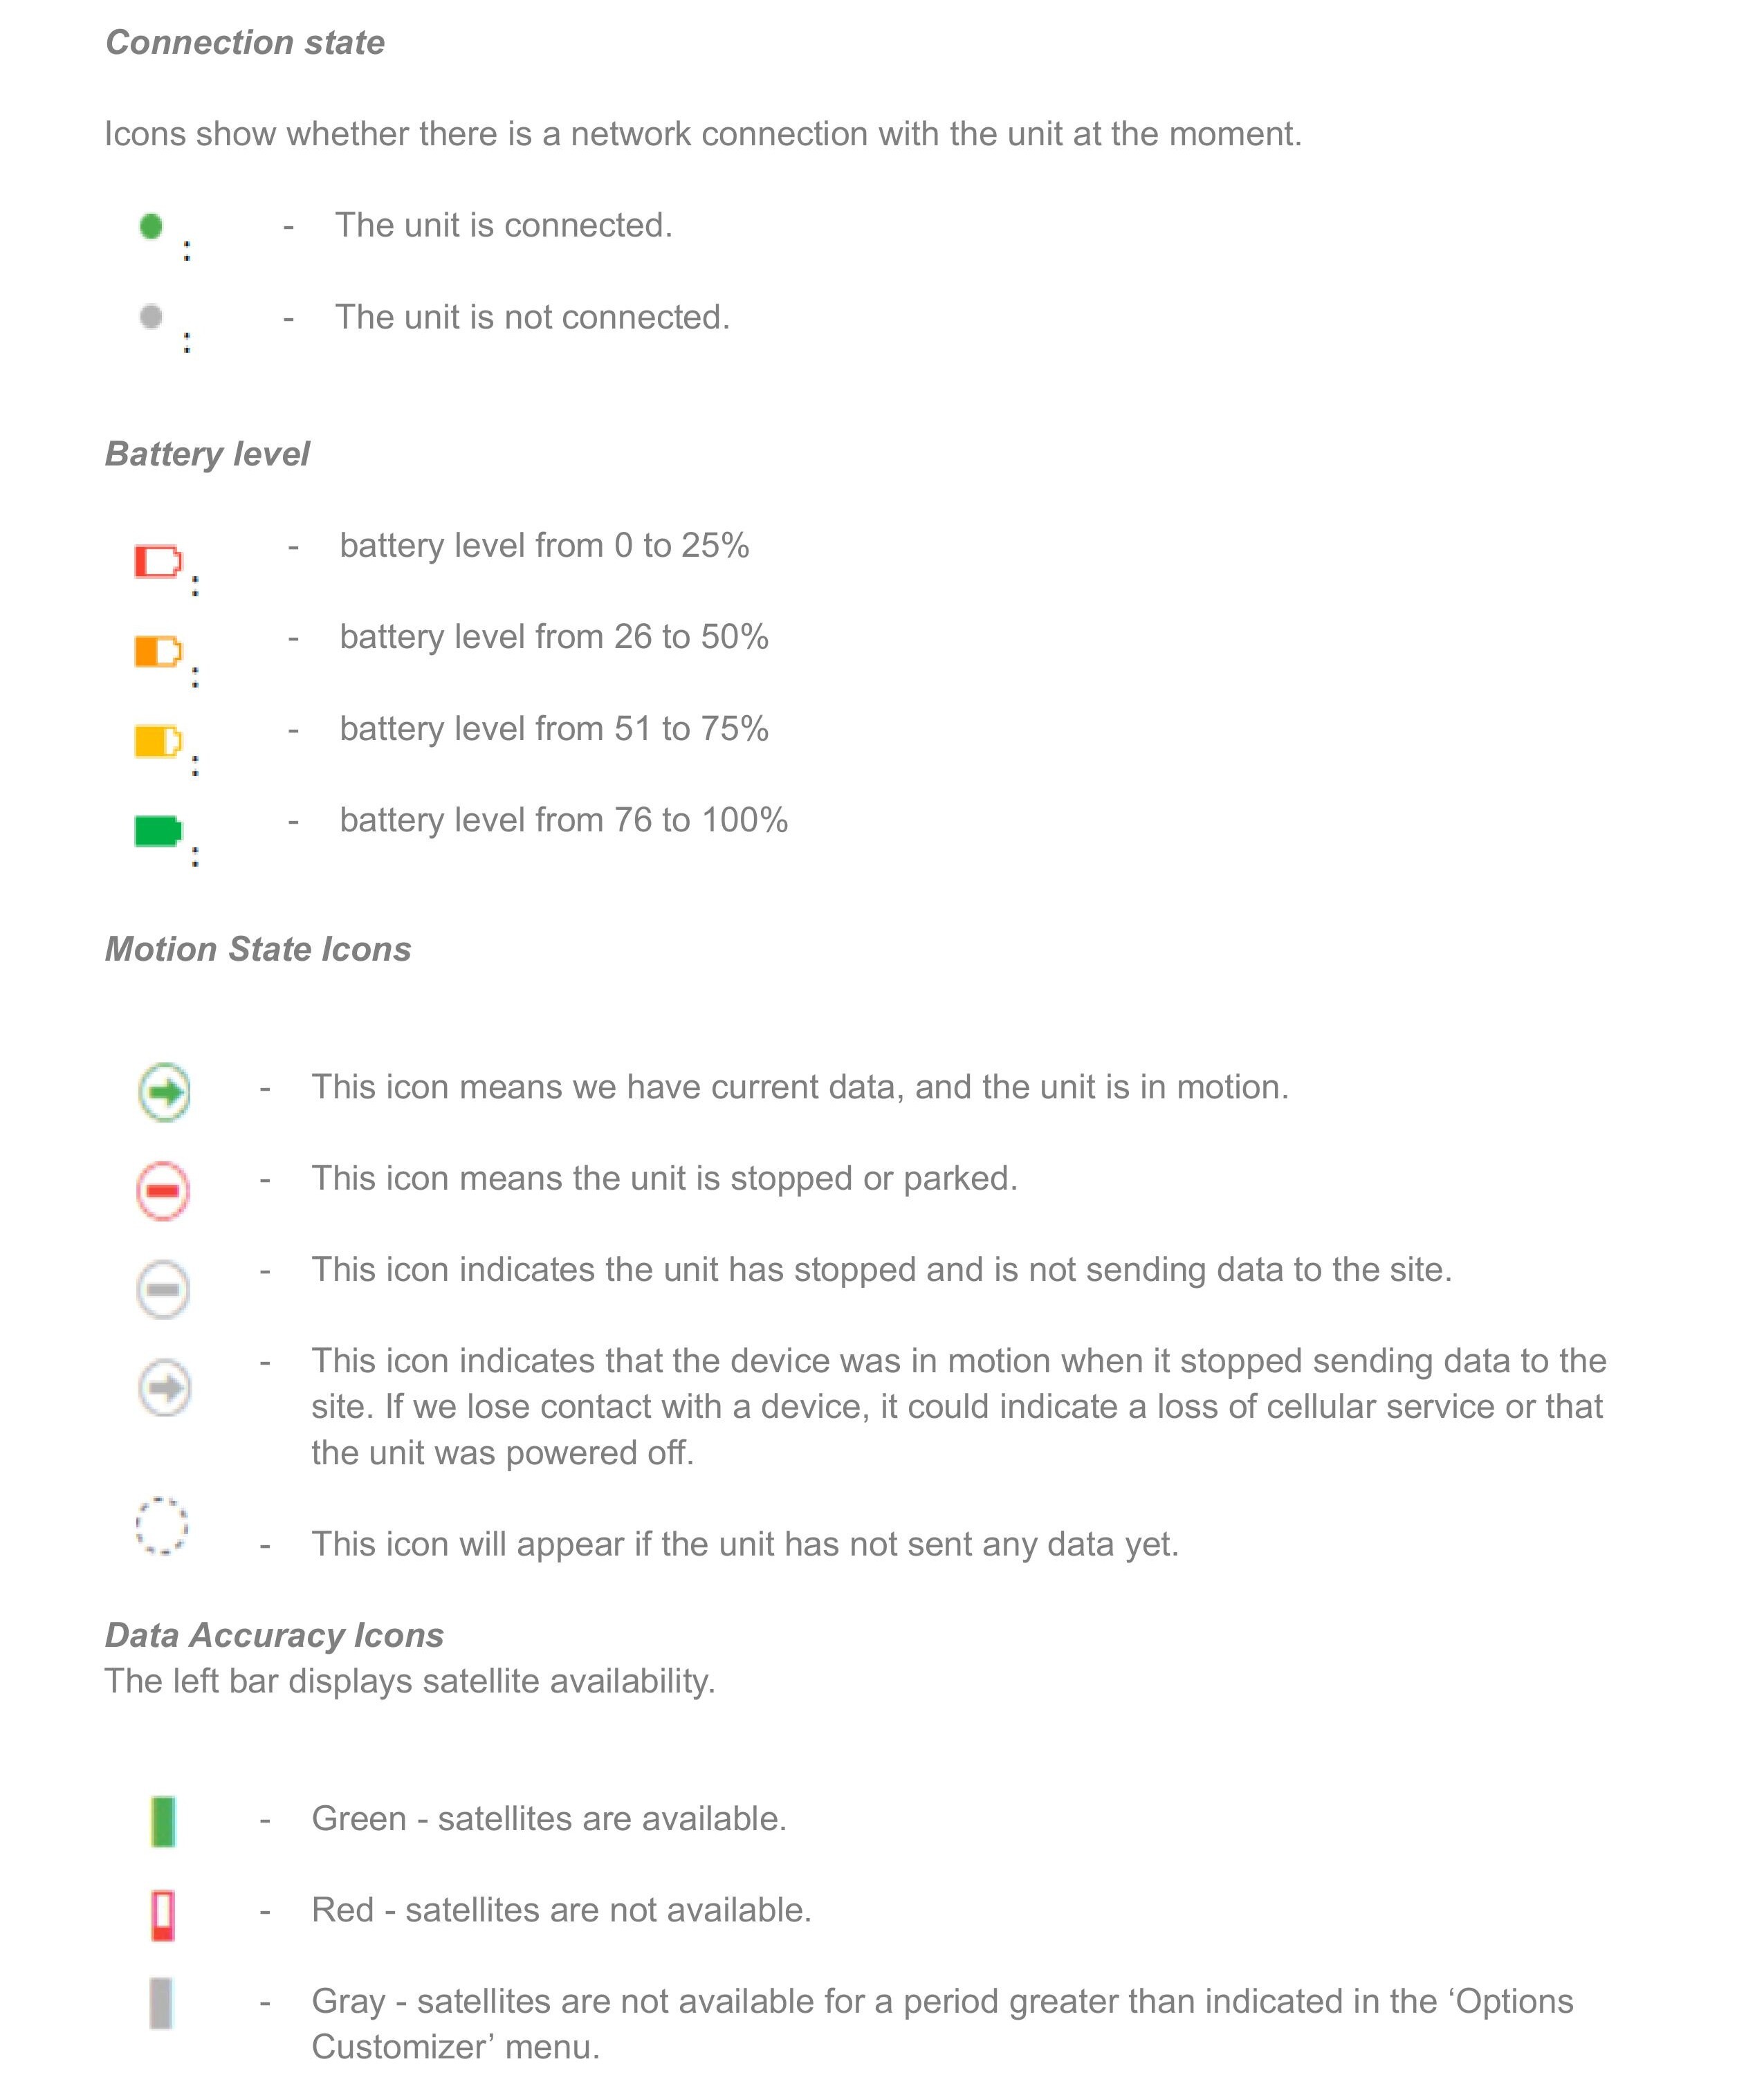
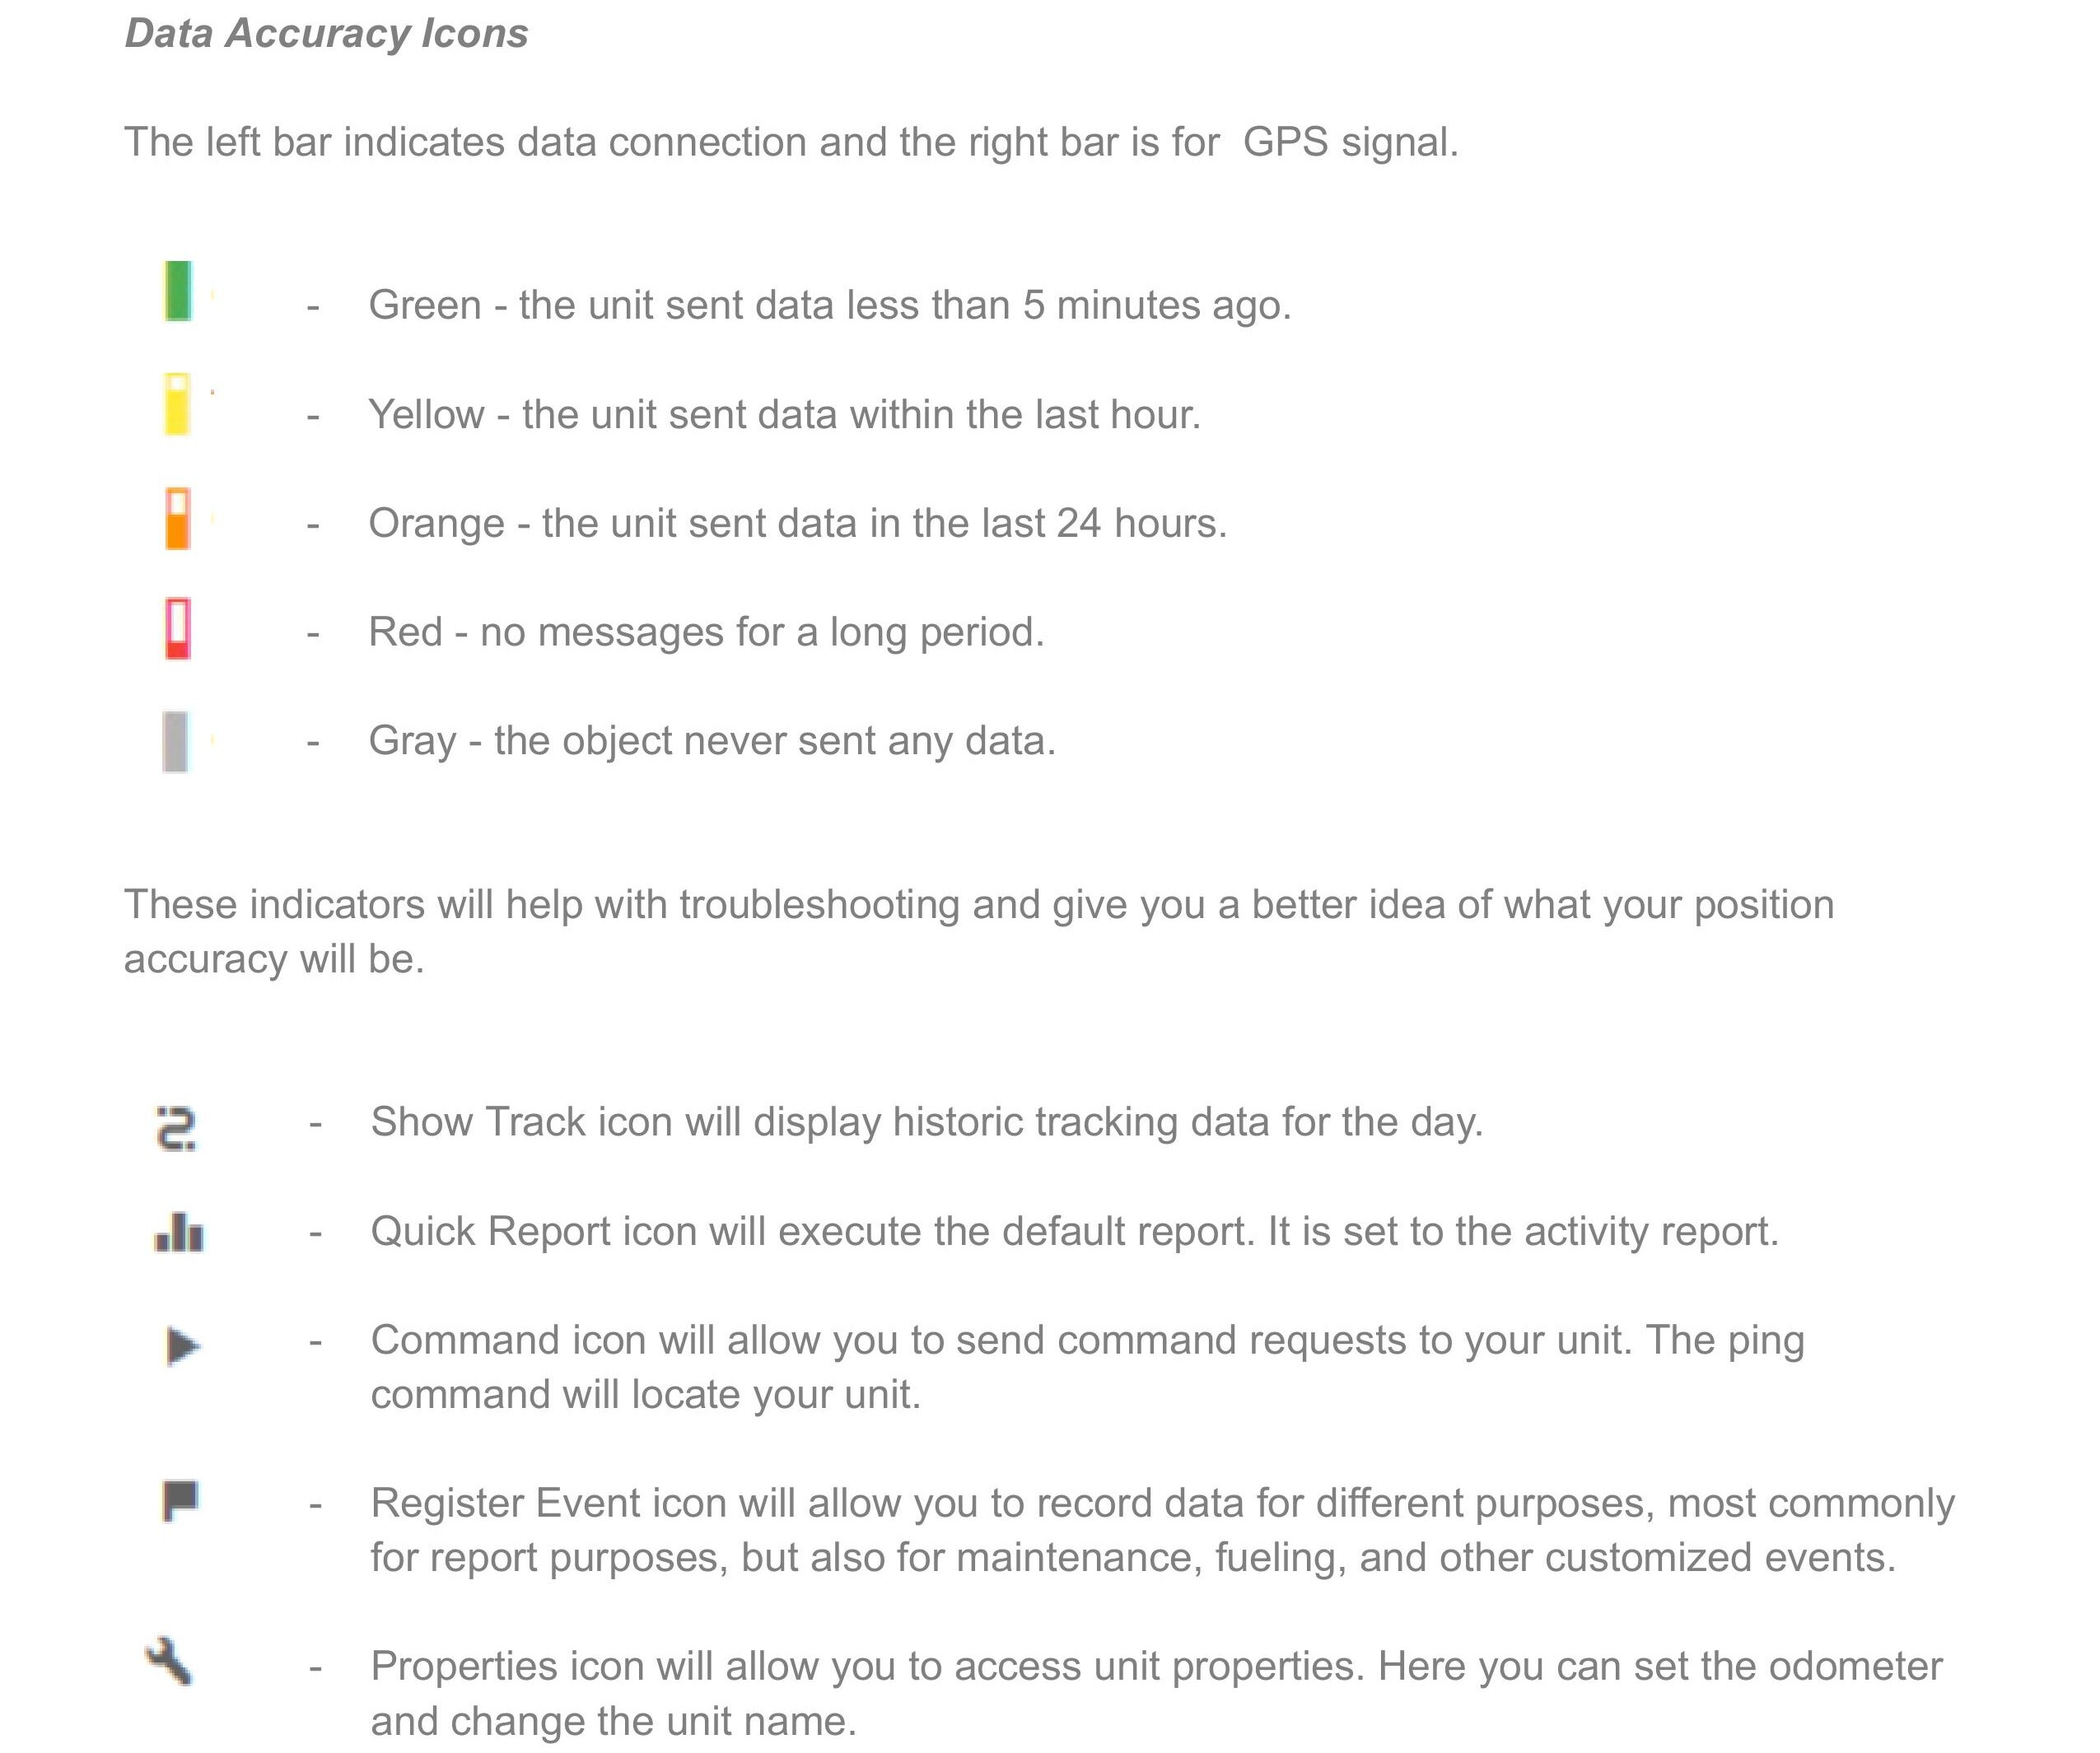
Monitoring Tab Icons
This section shows the icons and explains their meanings.
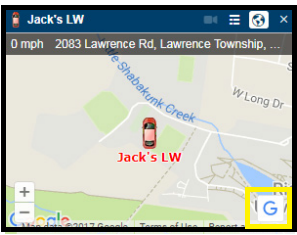
Mini Map
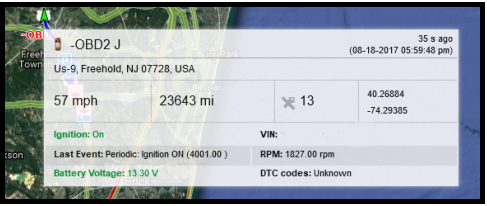
A Mini Map displays in a popup window with current information about the selected unit. If you click on the unit icon on the map or the unit in the list, it will open a new small map window.
The mini-map will center on the unit and follow it as it moves. The mini-map window will appear and you can move it anywhere within that window.
The G icon in the right corner of the mini-map will provide you with a Google Street View where it is available.
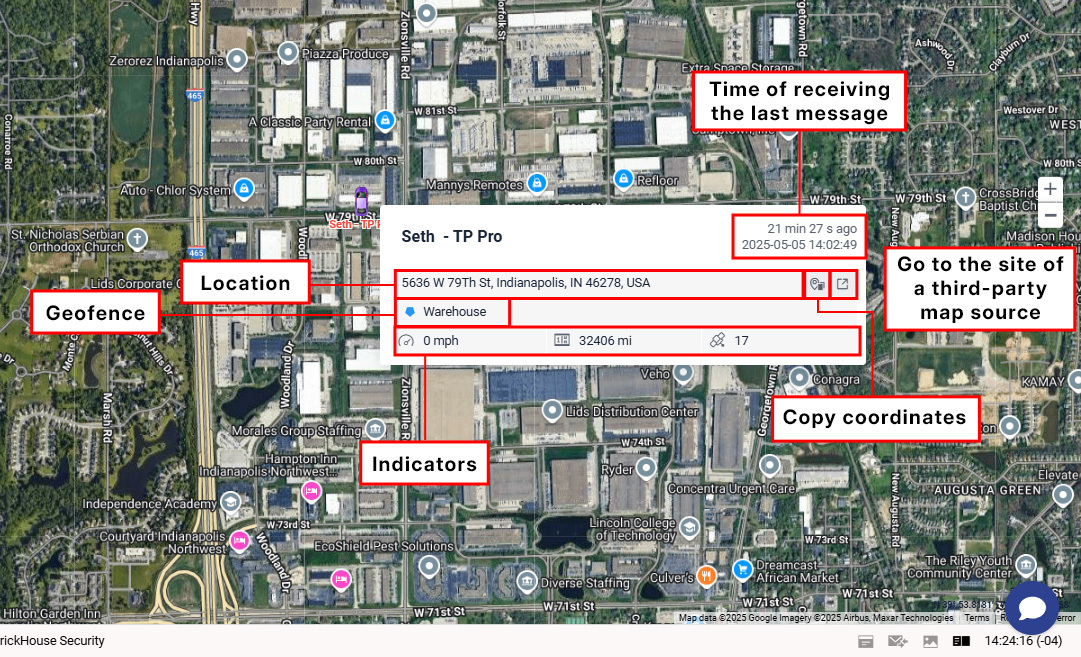
Additional Unit Information
You can view detailed unit information in two places:
The unit tooltip (shown when hovering over the unit on the map)
The extended unit information section in the Work List on the Monitoring tab
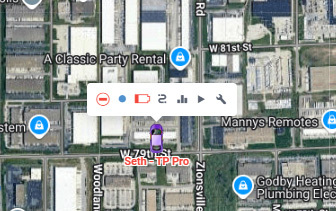
Monitoring options menu
To open the menu of monitoring options, click on the unit on the map. This menu contains the same functions that are selected for the work list of the Monitoring tab. In addition, regardless of the selected options, the menu always contains the icons for generating a quick report and building a quick track.
The menu of monitoring options doesn't contain information about the unit location, the tracking option, and the icon for removing the unit from the work list even if they are selected as monitoring options.
When a unit moves on the map, the menu moves with the unit. To close it, click anywhere outside the menu.
Monitoring Options
The Monitoring tab offers a range of tools and indicators for managing and tracking units. You can customize which options are visible based on your workflow. To do this, ensure that the Can change settings permission is enabled in your user properties.

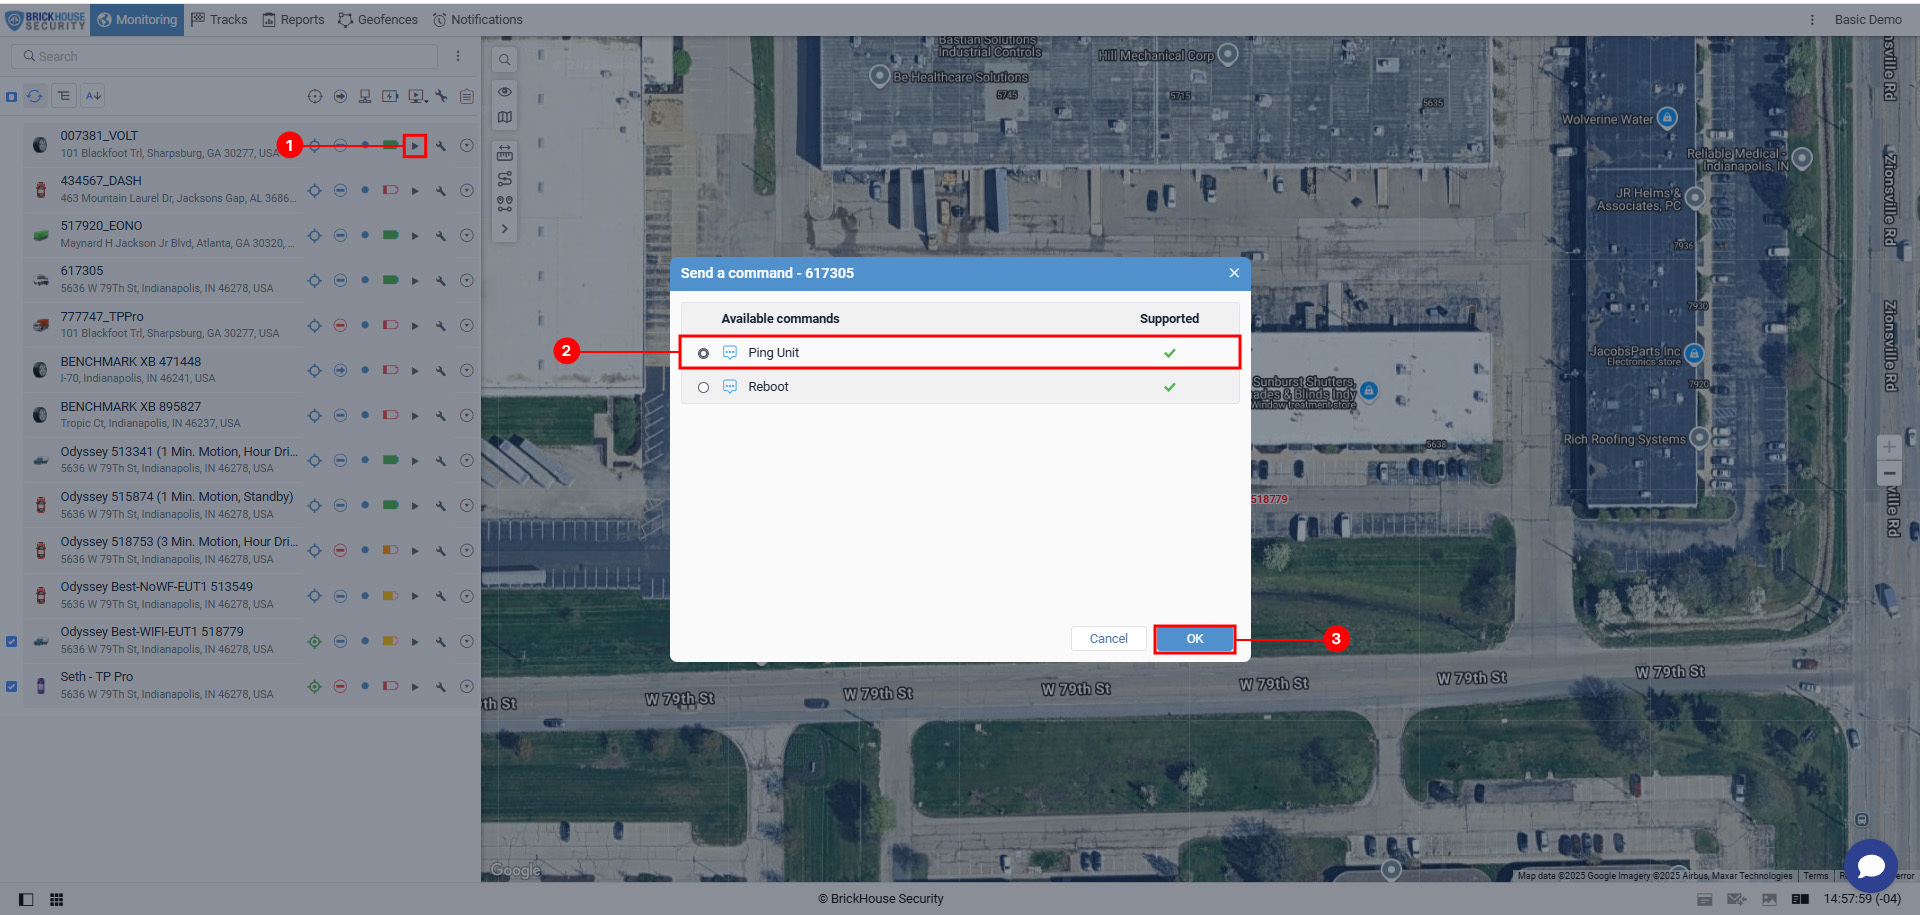
Sending Commands from the Monitoring Tab
To send a command:
1. Locate the unit or group in the Monitoring tab.
2. Click the command icon in the unit’s row or open the additional menu and select the command option and click OK.
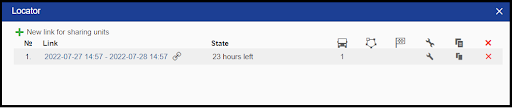
Locator
The Locator tool lets you share a unit's real-time location with others. Using the Locator involves two main steps: creating a sharing link and viewing the units on the map via that link.
To access the Locator, open the User Menu and select Locator.
Life span is when the link you provide expires. The box shows all the available units. Select one by highlighting a unit in the left box and clicking on the right double arrow. If you wish to remove one from the list, highlight it in the right box and use the double left arrow.
Select Tracks to display the historical tracking of the day. Select Geofences to show Geofences. To keep things simple, leave the sensor masks unchecked. Click OK at the bottom right.
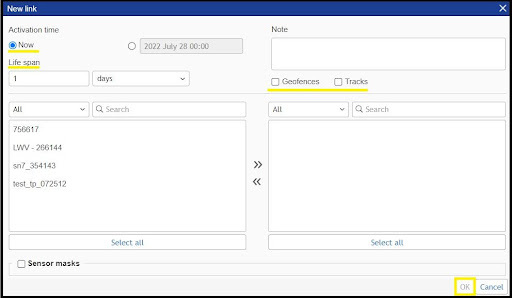
After you click OK, you will be provided with a link. If you click on the chain icon, it will copy the link so it can be added to an email or a document for sharing.
Tracks Tab
A track is a line drawn on the map to show how a unit moved during the indicated period. A track is mapped using the points from where messages were reported. Each point stores the date and time when the message was received and coordinates at the point, as well as other parameters (speed, sensors, etc.).
To open the Tracks tab, select a corresponding name in the top panel or click on the necessary item in the main menu customizer.
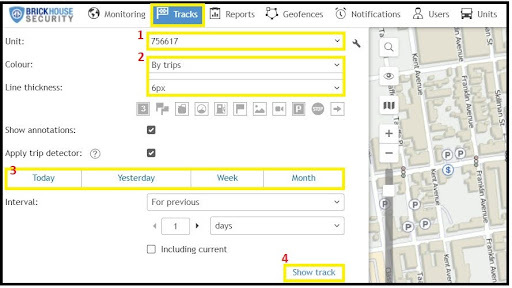
Mapping a Track
- Select a unit in the dropdown list. Its contents depend on the list in the Monitoring tab and access to the units.
- Adjust the desired parameters for the track (color, thickness, etc.).
- Define the time interval within which you want to get the data.
- After filling in all the fields, press Show Track.
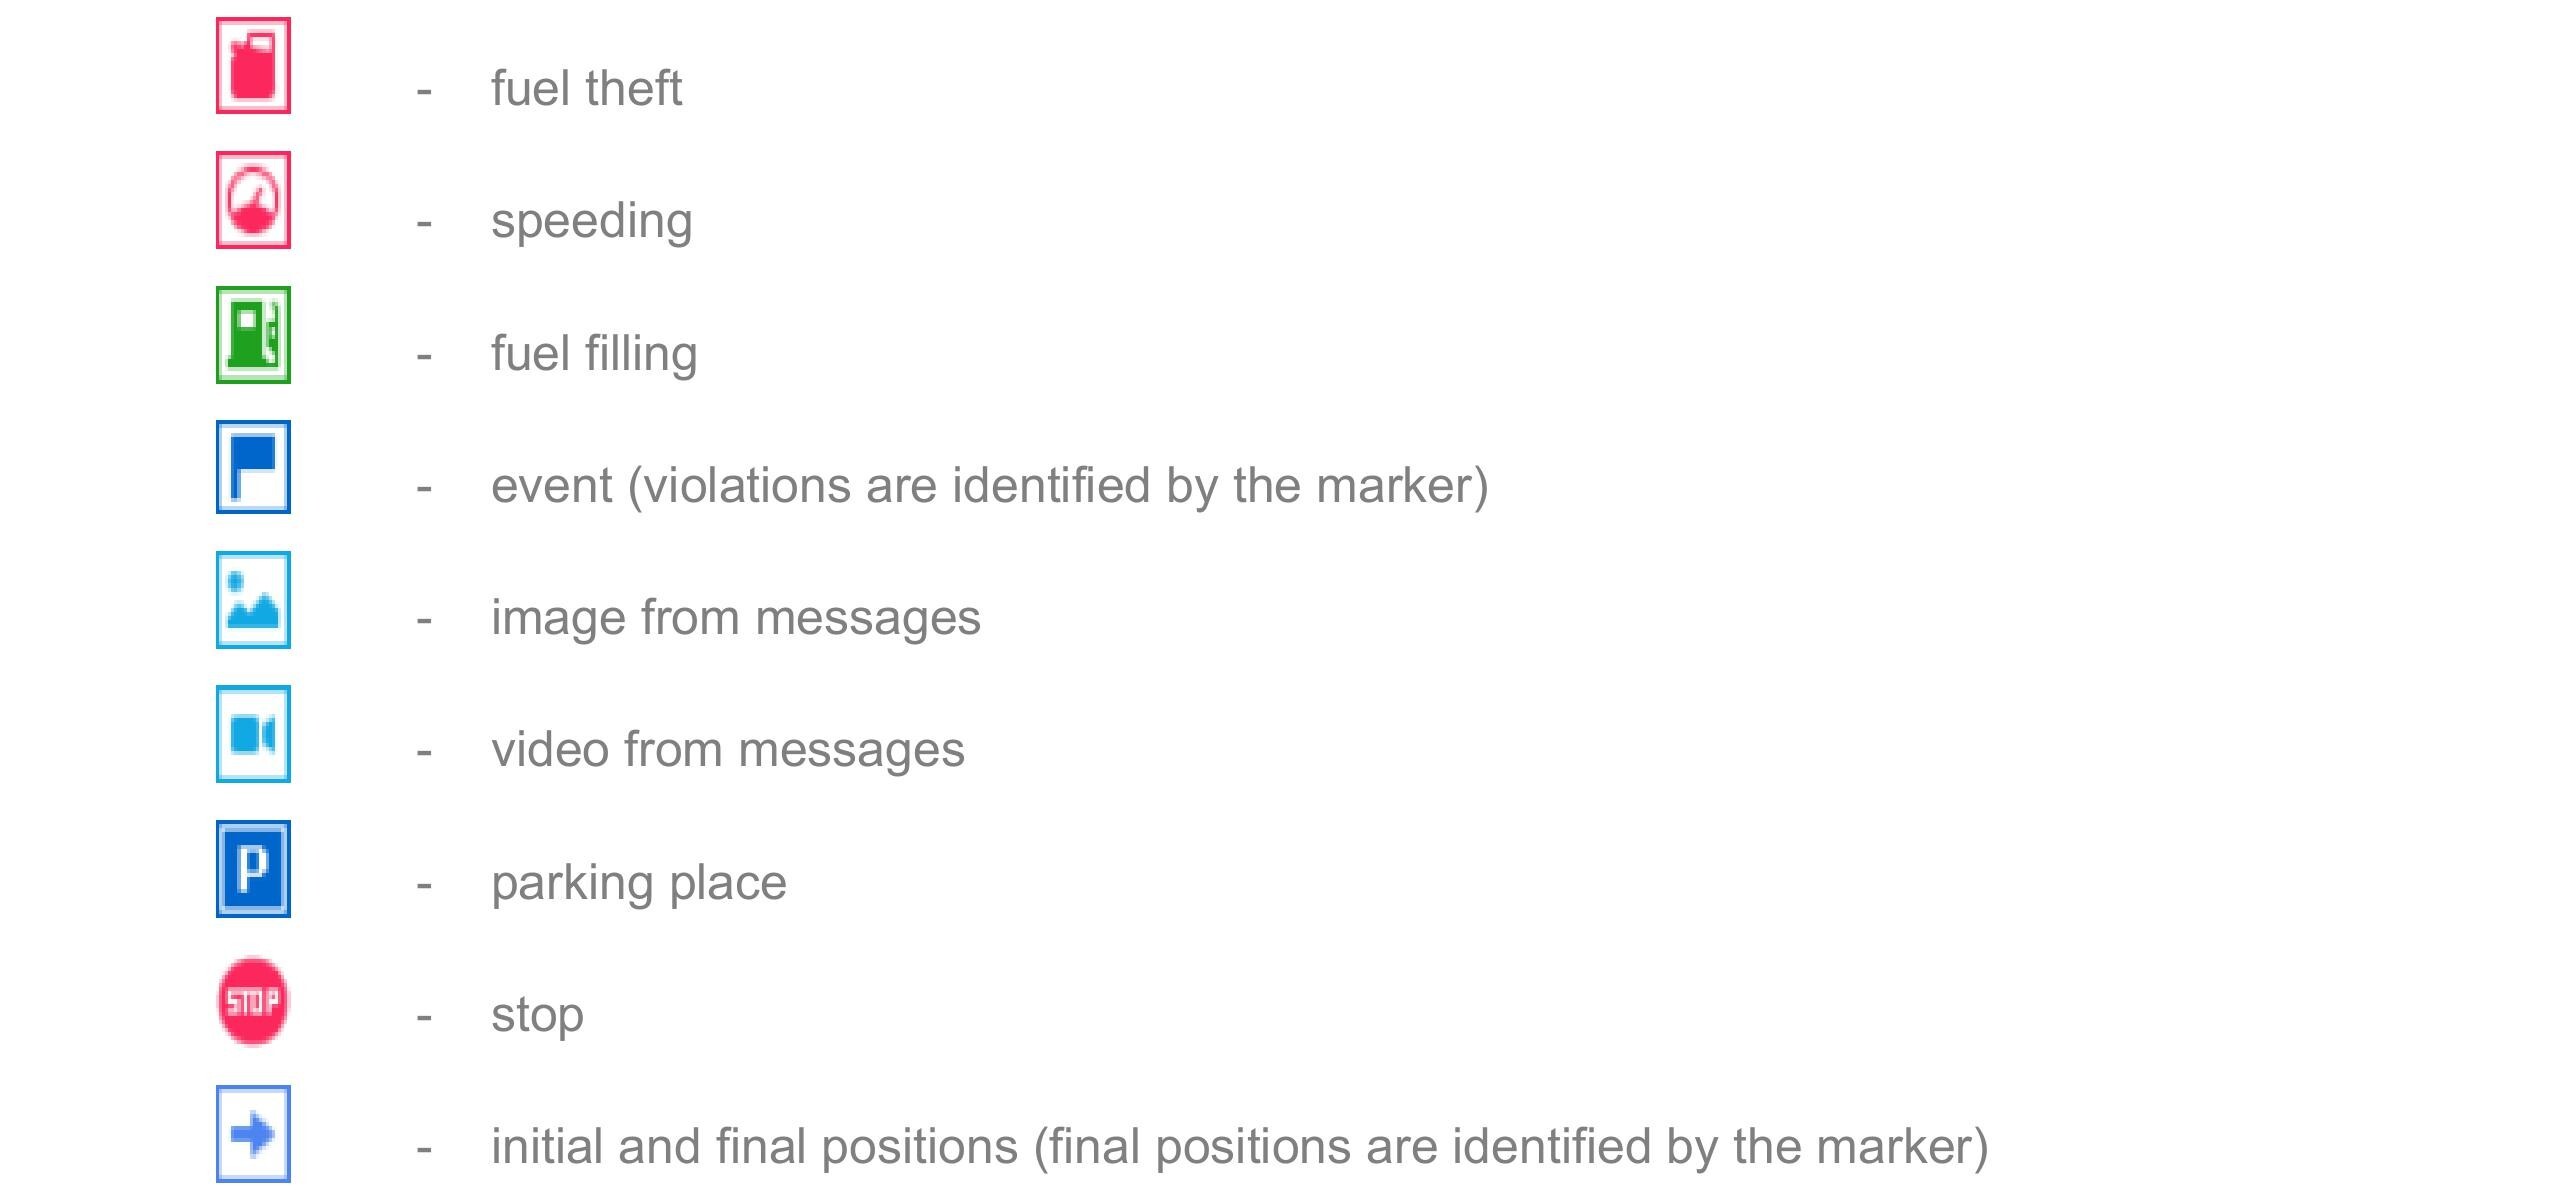
Markers
To highlight important events on the track, you can enable the display of markers. The set of available markers is the same as in the reports, but some require additional sensors to be installed in a vehicle:
Below, we see the result of choosing a single track (one solid color), but you can also select to show a single unit with varying colors for different sensor values and speeds.

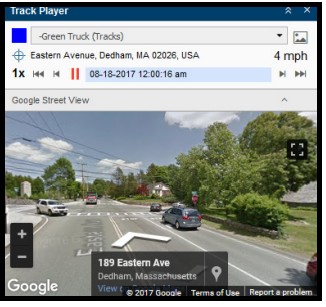
This will display the trip for the requested time period. You can now see the trip and play it back.
The track player will control the playback on the map and also includes Google Map street view images that correspond to the playback on the map.
You may also have a section for sensor values to watch during the playback.
Also, you can click on the circled icon below to see the trip as a geofence in the result line.
![]()
If you hover the mouse over the icon on the map on the tracking tab, the tooltip will provide you with information.
Reports Tab
To switch to the Reports tab, click the Reports header in the top panel and select the same name item in the main menu customizer.
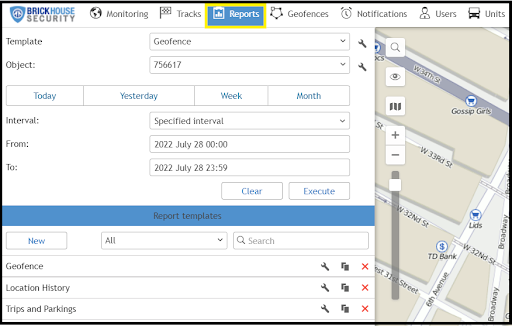
Reports on the activity of a unit are presented in the form of tables and graphs. They can be viewed in a browser window, as well as exported to files of various formats.
We have created report templates to make finding the data you need easy. The most useful is the activity report, which includes most data available in its tables. Other report types are customized to suit your needs, so you don’t have to hunt through the tables.
To obtain a report, set parameters in the work area: select the report template, unit, and reported interval, then press Execute.
Geofences and Notifications
For a deeper understanding of how Geofences and Notifications work, including setup, customization options, and best practices, please refer to our dedicated article. This guide provides detailed insights to help you make the most of features:
Unit Customization
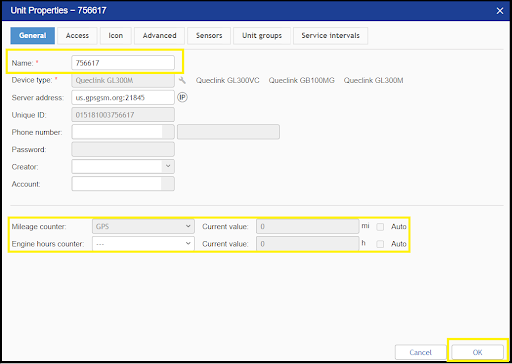
Changing your device’s name is an easy customization. From the Units tab, select the Unit Properties or wrench icon. Click in the Name field, delete what is in the field, and type in a new name. To update the odometer information associated with a device, edit the mileage counter value to match what the vehicle’s odometer reading currently is and click OK.
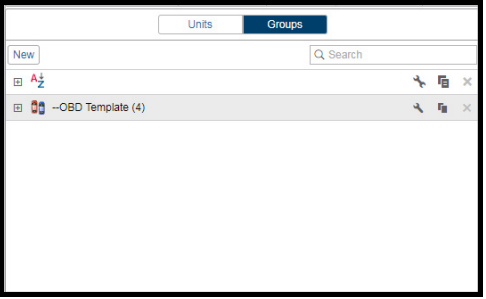
Managing Groups
In the Units tab, which may need to be added by following instructions for customizing your interface, you can access the Groups section.
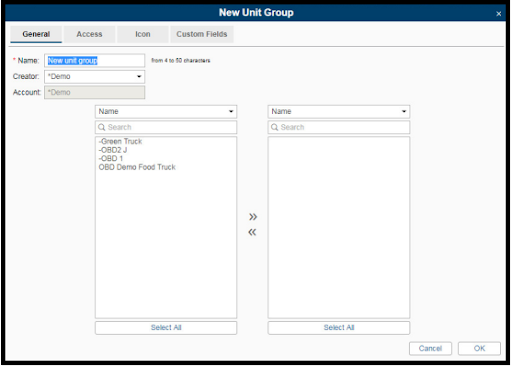
Click New in the upper left to begin.
Use the interface to create your group. Highlight a unit in the left pane and use the double right arrow to add it to the group you are creating. Use the double left arrow to remove a unit from the group. Give it a name and click OK.
Thank you for choosing BrickHouse Security for your GPS tracking solutions. We are committed to providing you with reliable service and support.
If you require further assistance or have any questions regarding our products or services, please don’t hesitate to contact us through any of the following methods:
-
Phone: 800-654-7966
-
Live Chat: Available at BrickHouseSecurity.com
Our support team is here to help ensure you get the most out of your GPS tracking experience.
Feb 2nd 2024