Support: BrickHouse Team Phone Tracker App User Guide for Android
The BrickHouse Phone Tracker Mobile app is an application providing you with the basics of tracking via your smartphone device. The BrickHouse Locate GPS Mobile app is available for both Android (smartphone) and iOS (smartphones, and computer) platforms. This is an Android User’s Guide.
The BrickHouse Phone Tracker application is used for tracking the unit’s location. The BrickHouse Phone Tracker can be installed on Android-based mobile devices. The location is tracked mainly using GPS; therefore, the device will need to have an active data plan.
Position data is sent from the mobile device to the locate.brickhousesecurity cloud to be stored. Besides position data (coordinates, course, speed. etc.), images, alarm messages, and custom statuses can also be sent to the server. Data received from a mobile device can be processed by a tracking system and presented in different forms such as tracks of travelled routes on the map, notifications, etc.
Download User Manual
Getting Started
Starting the Application and Selecting a Mode
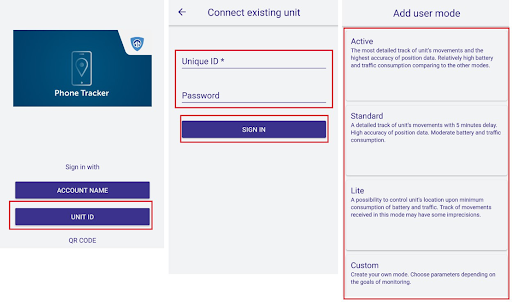
You should have received an email containing your Unique ID and Temporary Password. This information is required to access the features of the BrickHouse Phone Tracker application.
To begin, open the BrickHouse Phone Tracker app and select a UNIT ID to launch the application. Then, enter your Unique ID and Temporary Password in the designated fields.
Choosing a User Mode
After connecting to the BrickHouse Phone Tracker, you will need to select a user mode: Active, Standard, Lite, or a Custom mode. Each mode determines how location data is collected and transmitted, balancing accuracy, battery usage, and data consumption.
Active Mode
This mode offers the most detailed tracking and the highest positioning accuracy. It is ideal when precise real-time tracking is required.
-
Data Collection: Continuous
-
Data Transmission: Continuous
-
Maximum Accuracy: 30 meters
-
Battery & Data Usage: High
Standard Mode
This mode provides accurate tracking with updates every 5 minutes, offering a good balance between accuracy and resource consumption.
-
Data Collection: Smart mode
-
Data Transmission: Every 5 minutes
-
Maximum Accuracy: 50 meters
-
Battery & Data Usage: Moderate
Lite Mode
Designed for minimal battery and data usage, this mode provides basic location tracking. Accuracy may be reduced compared to other modes.
-
Data Collection: Every 5 minutes
-
Data Transmission: Every 5 minutes
-
Maximum Accuracy: 1000 meters
-
Battery & Data Usage: Low
Custom Mode
In this mode, you can define all tracking parameters manually to suit specific tracking requirements. By default, Custom mode starts with the same settings as Standard mode.
Mobile App Main Screen Overview
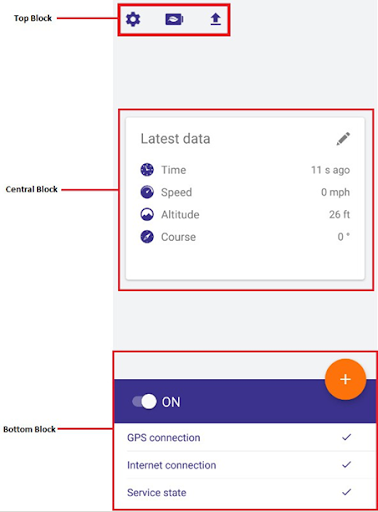
The main screen of the BrickHouse Phone Tracker mobile app is divided into three sections: Top Block, Central Block, and Bottom Block. Each section contains specific controls and information displays essential for using the application effectively.
Top Block
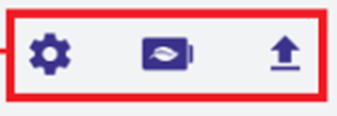
The top block contains three interactive icons:
-
Arrow Icon
Downloads messages from the "black box." A red indicator appears when new messages are available. -
Battery Icon
Activates Power Save Mode when tapped. -
Gear Icon
Opens the Settings menu of the application.
Central Block
The central section displays unit information and allows interaction with current data:
-
Latest Data View / Current Status Send
Use a horizontal swipe to switch between viewing the latest data and sending the current status of the unit.
Note: To receive or send location data, the following conditions must be met:
-
GPS is enabled
-
An active internet connection is available
-
The location determination service is started
Bottom Block
Upon first launch, the unit’s location determination service is turned off. To start it, tap the button at the top of the bottom block.
The bottom block also shows the real-time status of the app’s essential functions:
-
GPS Connection – Indicates whether GPS is available
-
Internet Connection – Indicates whether the app is connected to the internet
-
Service Status – Displays whether the location determination service is active or stopped
Other
-
Tap the ‘+’ (plus) button to open the Actions Menu
Note: Performing any action from the menu requires an active internet connection.
Actions Menu
Accessible though User mode option. This menu contains a list of actions available for a chosen user mode:
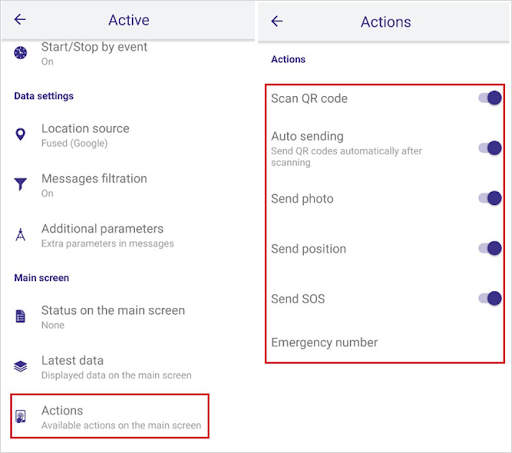
Scan QR Code
The built-in scanner allows you to work with both QR codes and barcodes. In the Actions settings menu, you can choose whether to preview the scanned code before sending or send it automatically.
Once a QR code (or barcode) is scanned, a message containing the qr parameter is sent to the server. The scanned value is stored in the system’s database and can later be used for monitoring and tracking purposes.
Auto Sending
You can enable or disable the automatic sending of scanned codes in the Actions settings.
Note: An active internet connection is required to perform any actions from this menu.
Send Photo
Photos sent via the application are stored in the system’s database and can be used for monitoring and reporting purposes. Along with each image, the unit’s location is also transmitted to the server.
Before sending, it's recommended to set the desired image quality in the settings.
You can choose one of the following options:
-
Send from Camera
Use this option to take a new photo and send it directly. -
Send from Library
Use this option to select and send an existing image from your device’s storage.
Send Position
This feature allows you to manually send the unit’s current location to the server. The position data is stored in the system’s database and is available for monitoring and analysis.
Send SOS
In critical situations, you can send an SOS (alarm) message. This message is marked in the monitoring system as: alarm=1.
When an SOS is sent, the app attempts to capture and send the current location of the unit. If the current location cannot be determined, the last known location will be used instead.
Note: An active internet connection is required to send an SOS.
Emergency Number
You can configure a phone number to receive SOS alerts directly via SMS or call, depending on the system’s configuration.
Custom Statuses
The BrickHouse Phone Tracker allows users to create and send custom status messages, offering greater flexibility for tracking and reporting.
Users can create multiple custom status templates, each containing a list of predefined status options. For example:
-
Template 1 might include: Free, Busy, Away
-
Template 2 might include: Private, Business, Unified
Custom templates are created and managed in the Settings section of the app. Once created, you can send a status by selecting it directly from the main screen of the application.
This feature helps tailor the app’s functionality to your specific use case or organizational needs.
Creating a Custom Status Template
To create a custom status template, follow these steps:
-
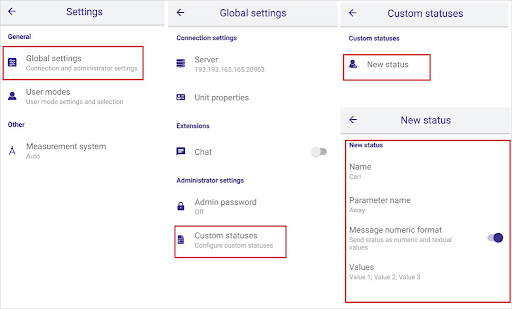
Open the application settings
From the main screen, tap the gear icon located in the top block. -
Navigate to 'Custom Statuses'
Under the Administrative Settings section, select Custom Statuses. -
Create a new template
Tap the "Create Template" button and fill in the required parameters:
-
Name – Enter a name for the template.
-
Parameter Name – Specify the name of the parameter that will be used in messages.
-
Message Numeric Format – Enable or disable the use of index numbers in message parameters.
-
Values – Add the required number of status values and assign a name to each (e.g., Free, Busy, Away).
Once saved, your custom template will be available for selection and use from the main screen of the application.
Sending Custom Statuses
Custom statuses created in templates can be sent directly from the central block of the main screen.
-
Use the horizontal swipe to switch between available templates.
-
Tap on a status to send it immediately.
When a status is sent, the system transmits a data message containing the selected parameter’s name and value. These messages are typically sent along with the unit’s current location. If the current GPS position is unavailable, the last known location will be used instead.
Usage in the Monitoring System
Sent custom statuses can be used in the monitoring system to trigger notifications and generate reports.
-
To configure notifications, choose the ‘Message Parameter Control’ type.
-
Notifications can be delivered via email, SMS, or online popup messages.
-
All received statuses can be logged in the unit’s database and included in custom reports.
Both alarm messages and custom statuses support this functionality, enabling detailed monitoring and response workflows.
Deleting a Template
To delete a custom status template:
-
Go to Settings > Administrative Settings > Custom Statuses.
-
Select the template you wish to delete.
-
Tap the Delete button at the bottom of the screen.
-
Confirm your action in the dialog that appears.
Administrator Settings Menu
The Administrator Settings menu allows you to configure various parameters that affect both the application’s functionality and the location determination service. The available settings for the user are listed under the ‘Visible Settings’ item in the Administrative Settings section.
Access Restrictions
Access to the settings can be restricted with an administrator password. To access the settings, tap the Gear icon on the Main Screen.
Global Settings
In this section, you can configure essential settings for the BrickHouse Phone Tracker app:
Connection Settings
These settings manage the connection to the locate.brickhousesecurity.com cloud platform.
Important: Do not delete or modify these settings. Altering or removing them will prevent the app from reporting to the server that monitors the BrickHouse Phone Tracker.
Unit Properties
-
Unique ID: This is the unique identification code assigned to your mobile device, allowing it to be recognized within the tracking system.
-
Password: If you wish to secure your unit with a password, enter it here. The same password must be entered in the corresponding field within the monitoring system's unit properties dialog. If the password is not correctly matched, the unit’s data will not be registered on the server.
Note: To request an update to your unit's properties, please contact support@brickhousesecurity.com.
Bind Unit
Use this section to select and bind the application to a specific unit.
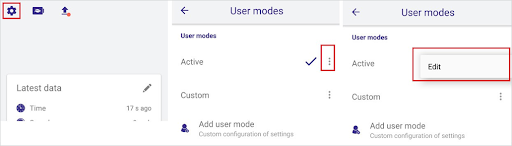
User Modes
The app offers several user modes that allow for customized data collection and reporting:
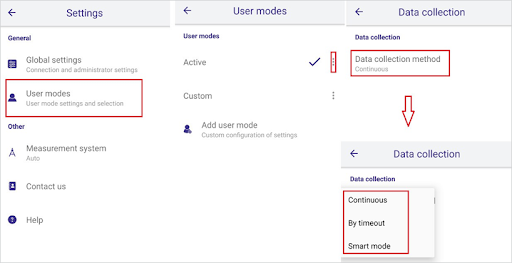
Active/Custom Operations Mode
This mode allows you to choose from various settings, which can be edited as needed:
-
Active Mode – Data collection is set to Continuous by default.
-
Custom Mode – Data collection defaults to Smart Mode, but this can be customized.
To edit these settings, tap the Gear icon on the Main Screen under the User Mode settings section.
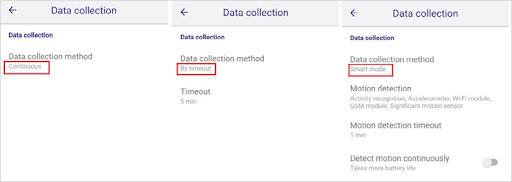
Data Collection Options
-
Continuous: Location data is collected constantly, providing the highest accuracy. However, this method consumes more battery and data traffic.
-
By Timeout: Location data is collected at regular intervals. The timeout period (default is 5 minutes) can be adjusted. The shorter the timeout, the more accurate the data, but this will increase battery and data usage.
-
Smart Mode: This method only collects location data when the unit is in motion. If the unit remains stationary for more than 5 minutes, the location service stops. The service will automatically restart when motion is detected. This is the most energy-efficient mode.
Continuous Mode
In Continuous Mode, location data is sent to the server continuously whenever new data arrives in the black box and when an internet connection is available. While this method provides real-time updates, it also actively consumes battery. Therefore, it is recommended to use this mode when your device can be regularly charged.
Timeout Mode
In Timeout Mode, location data is sent to the server at regular intervals (based on the timeout period you specify). After each transmission, the mobile device enters sleep mode to conserve energy.
Motion Detection
When Smart Mode is selected, motion detection parameters must be configured. Below are recommendations for different motion detection methods:
Activity Recognition
This method works on devices with the necessary hardware configuration. Its effectiveness may vary by device, so it’s recommended to test this method on each device to ensure proper functionality.
Accelerometer
This method is ideal for users who are walking. However, note that motion detection may sometimes be triggered by shaking the device while stationary, leading to occasional inaccuracies.
Wi-Fi
This method detects movement based on Wi-Fi availability. The logic is:
-
When connected to Wi-Fi, the unit is considered stationary.
-
When Wi-Fi is not available, the unit is considered to be in motion.
This method is not highly accurate due to the widespread presence of multiple Wi-Fi networks in urban environments, which can lead to inconsistencies.
GSM
In this method, motion is detected by monitoring the location of cellular base stations. The algorithm works as follows:
-
The device detects the location of nearby base stations and compares it after a set period of time.
-
If the location of the base stations changes, motion is detected.
This method can be less accurate, as there may be slight imprecision in determining the exact location of the base stations. It is recommended to test this method on each device to evaluate its performance.
Data Sending Method
Data can be sent using one of the following methods:
-
Continuous: Data is sent in real-time as it is received.
-
By Timeout: Data is sent at regular intervals. The timeout value must be no less than 5 minutes.
-
Manual: Data is sent only when triggered manually.
Roaming Settings
Use the "Work in Roaming" checkbox to control whether the mobile device sends data while in roaming. Enabling this option allows data transmission during roaming, while disabling it prevents the app from sending data in roaming mode.

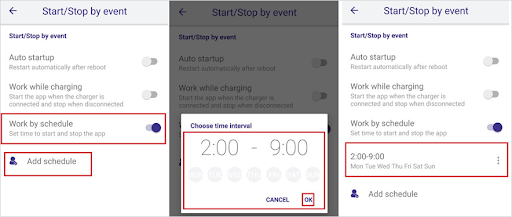
Start/Stop by Event
Auto Startup
Check this box to automatically launch the WiaTag app after your mobile device has been rebooted.
Work While Charging
Enable this option to automatically start the WiaTag service when your device is connected to a charger, and stop the service when the charger is disconnected.
Work by Schedule
This feature allows you to start or stop the service automatically according to a set schedule. When this option is selected, your created schedules will be displayed. You can edit or delete these schedules as needed. Below is a guide on how to create a new schedule.
Add Schedule
Schedule creation is only available when the ‘Work by Schedule’ option is enabled. Tap the ‘Add Schedule’ button, then set the time interval and days of the week when the service should start and stop.
Data Settings
Location Source
This option allows you to select the method used for determining the unit's location. You can choose from:
-
Google Fused (default)
-
GPS
-
Wi-Fi and Mobile Networks
-
GPS + Wi-Fi + Mobile Networks
Note that the corresponding options must be enabled in your mobile device's settings for these methods to function properly.
Messages Filtration
Activating this option applies filters to the messages before they are sent to the server. This filtration is only applicable to messages generated by GPS, as data from wireless technologies like Wi-Fi and mobile networks may not provide complete information (e.g., speed, course, satellites count), and accuracy can exceed 2000 meters.
The filtration conditions are based on the following parameters, using a logical OR operation. This means a new message will be generated if any of the conditions below are met.
Note: The Max Accuracy and Max Speed parameters are used to exclude messages with unusually high or unrealistic values, which are considered invalid. These filters are always applied, regardless of whether message filtration is enabled.
-
Max Accuracy: The maximum acceptable accuracy for location data. If the accuracy exceeds this value, the message is considered invalid and will not be sent to the server. This filter is always active.
-
Min Time Interval: The minimum time interval (in seconds) between two consecutive messages sent to the server. A new message is generated once the specified time has passed since the last message.
-
Min Distance: The minimum distance between two location points. A new message is generated when the unit has traveled the specified distance since the last message.
-
Change in Course: The minimum change in direction (in degrees) required to trigger a new message. This helps filter out small directional shifts that don’t warrant new data being sent.
-
Change in Speed: The minimum difference in speed between the previous and current messages that triggers a new message. This helps track significant changes in speed.
Additional Parameters
Select the additional parameters you would like to include in data messages sent to the server:
-
LBS Data
Includes information about the nearest cell towers (e.g., cell tower ID), which can be useful for location tracking in areas with weak GPS signals. -
Provider Name
Adds the parameter ‘p’ to the message, indicating the source of the location data (e.g., GPS, Wi-Fi, mobile network). -
Accuracy
Adds the parameter ‘a’, which reflects the accuracy of the detected location in meters. -
Battery Level
Adds the parameter ‘b’, displaying the device’s battery level as a percentage at the time of data transmission. -
Last Status
Includes the most recent custom status selected for the unit, helping to provide context to the data.
Thank you for choosing BrickHouse Security for your GPS tracking solutions. We are committed to providing you with reliable service and support.
If you require further assistance or have any questions regarding our products or services, please don’t hesitate to contact us through any of the following methods:
-
Phone: 800-654-7966
-
Live Chat: Available at BrickHouseSecurity.com
Our support team is here to help ensure you get the most out of your GPS tracking experience.
Jan 3rd 2024