Support: Setting Notification Limits and Schedules
In Step 2 of creating or editing a notification, you can customize when notifications are triggered, how often they are sent, and how long they remain active. These settings help reduce false alerts and ensure notifications are delivered only when they matter most.
Available Options
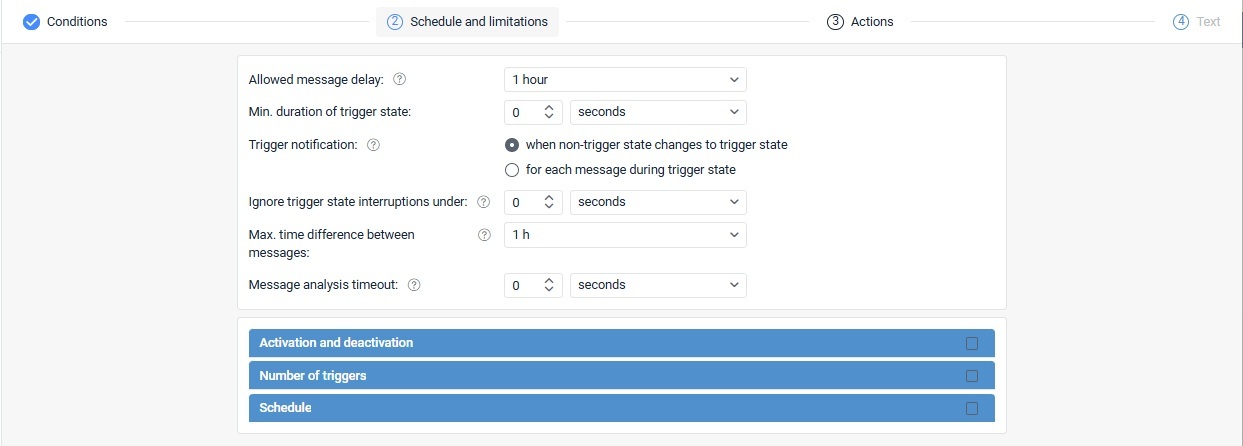
Allowed Message Delay
(Previously called: Controlled period from current time)
This setting defines the maximum allowed time between when a device generates a message and when that message is received by the server. If the delay exceeds your specified limit, the message is ignored, and no notification is triggered.
For Fuel drain, Fuel filling, and Battery charging notifications, this setting refers to the time between the actual event (such as a fuel fill or battery charge) and when it is recorded in real time.
Recommended: Set this delay to at least 1 hour to allow enough time for accurate data processing.
Minimum Trigger State Duration
This option helps prevent accidental or false alerts caused by brief tracker errors, such as temporary GPS inaccuracies or short geofence interruptions.
Use it to specify how long a condition must remain active before a notification is sent.
Examples:
- Speeding for at least 5 minutes
- Remaining outside a geofence for 2 minutes
Available range: Up to 24 hours
This setting applies to all selected notification conditions together.
Trigger Notification
(Previously called: Generate notification)
Choose when notifications should be sent:
When a non-trigger state changes to a trigger state
This option sends a notification only when the monitored condition changes from inactive to active.
Best for: Alerts when a specific event first occurs.
Important: Make sure the unit is not already in the trigger state when enabling the notification.
Example:
If your notification requires:
- Entering a geofence
- Speed above 60 km/h
- Sensor value between 5 and 10
The notification is triggered only when all conditions become true after previously not being met.
For each message during the trigger state
This option sends a notification every time a new message meets the trigger conditions, even if the state hasn’t changed.
Best for: Continuous monitoring or repeated updates during an ongoing event.
Ignore Trigger State Interruptions Under
(Previously called: Min. duration of the previous state)
Available only when using When non-trigger state changes to trigger state.
This setting prevents repeated alerts when the trigger state is interrupted briefly.
Example:
If speeding alerts require 2 minutes of normal speed before retriggering, brief drops below the speed limit won’t immediately reset the alert.
Maximum value: Up to 24 hours
Maximum Time Difference Between Messages
This option sets the maximum allowed gap between the triggering message and the previous one.
If the time gap is larger than your selected value, the notification will not trigger.
Useful for: Avoiding alerts based on outdated or delayed messages.
Message Analysis Timeout
This setting controls how long the system waits before analyzing a newly received message.
Recommended: Use a longer timeout for devices with black box memory, since stored messages may upload after connectivity is restored.
Maximum value: Up to 30 minutes
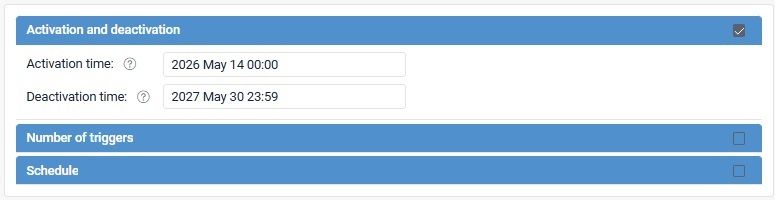
Activation and Deactivation
Use these settings to define when the notification is enabled.
- Activation time: When monitoring begins
- Deactivation time: When monitoring ends
Outside this period, the notification is disabled.
Number of Triggers
Set a maximum number of times a notification can be triggered.
Once the limit is reached, the notification is automatically disabled.
Example:
If Max. Triggers are set to 5 for 2 units; the notification stops after a combined total of 5 triggers across both units.
You can also apply a schedule so this limit only applies during certain time periods.
Note: Trigger counts are based on when messages are registered on the server, not when the event originally occurred.

Schedule
Use the Schedule section to control exactly when notifications are active.
Outside the selected schedule, notifications will not trigger.
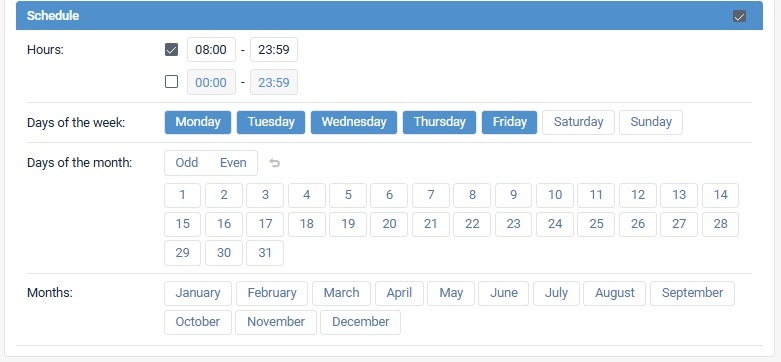
Hours
Set one or two daily time ranges for monitoring.
Example:
00:00–13:59 includes the full minute from 13:59:00 to 13:59:59.
Days of the Week
Choose specific weekdays for monitoring.
Days of the Month
Select exact calendar dates.
Helpful shortcuts: Quickly choose all odd or even dates.
Months
Select which months notifications should remain active.
How Scheduling Works
- Hours only: Active every day during those hours
- Hours + Days + Months: Active only during selected times on specified days and months
- Months only: Active continuously throughout selected months
Pro Tip
Combining trigger limits with scheduling gives you more precise control, helping reduce unnecessary alerts while focusing on the events and timeframes most important to you.
Related Articles
Support: Locate GPS New Notification Builder
Support: Locate GPS Notification Condition Types and Combination Rules
Support: Configuring Notification Conditions
Support: Configuring Notification Actions
Thank you for choosing BrickHouse Security for your GPS tracking solutions. We are committed to providing you with reliable service and support.
If you require further assistance or have any questions regarding our products or services, please don’t hesitate to contact us through any of the following methods:
-
Phone: 800-654-7966
-
Live Chat: Available at BrickHouseSecurity.com
Our support team is here to help ensure you get the most out of your GPS tracking experience.
Oct 31st 2024